Smart Paperwork: class packets, custom forms and online evaluations
On this page
- What Smart Paperwork is
- Before you start
- The class Paperwork tab
- Add your own fillable forms
- Online class evaluations
- Permissions
- Troubleshooting and FAQ
Smart Paperwork fills in your class forms for you. Instead of building and typing each form by hand, you keep one paperwork packet per class, let the system fill it from your class and student data, then review, sign, download and export it — all from one tab. This article covers the class Paperwork tab, adding your own fillable forms, and running online class evaluations.
What Smart Paperwork is
Smart Paperwork turns the forms your classes need — rosters, skills checklists, exam sheets and certificates — into one packet that the system fills in from your class, instructor and student information. You prepare the packet, close it out with final attendance and results, sign it, and then download the finished PDF or export a roster file for your training agency.
It replaces the old drag-and-drop paperwork builder. Your older forms still work: you can view them, and you can convert one into a fillable form when you are ready. The original is always kept, so converting never loses your old version.
Before you start
Three things need to be in place before a class packet will fill in cleanly:
- The course has a packet. Each course that should produce paperwork needs a packet of forms assigned to it. You can attach your own forms to a course yourself (see Add your own fillable forms) — attaching a form to a course creates the course's packet automatically. A class whose course has no packet shows “No paperwork is assigned to this course.”
- The forms are matched and approved. Each form's fields need to be matched to your data (for example, student name, class date, instructor) and approved. For forms you add, you do this yourself when you upload them. A form that still says Needs mapping cannot be filled until its fields are matched and approved.
- You have the right access. The Paperwork tab is available to staff roles; students never see it. Signing a packet is limited to the class's lead instructor, an Admin or the Owner. See Permissions for the details.
Your own fillable forms are matched and approved by you when you upload them, so they are ready to attach to a course right away. Shared forms and packets provided by CPR Enroll are matched for you by our support team.
The class Paperwork tab
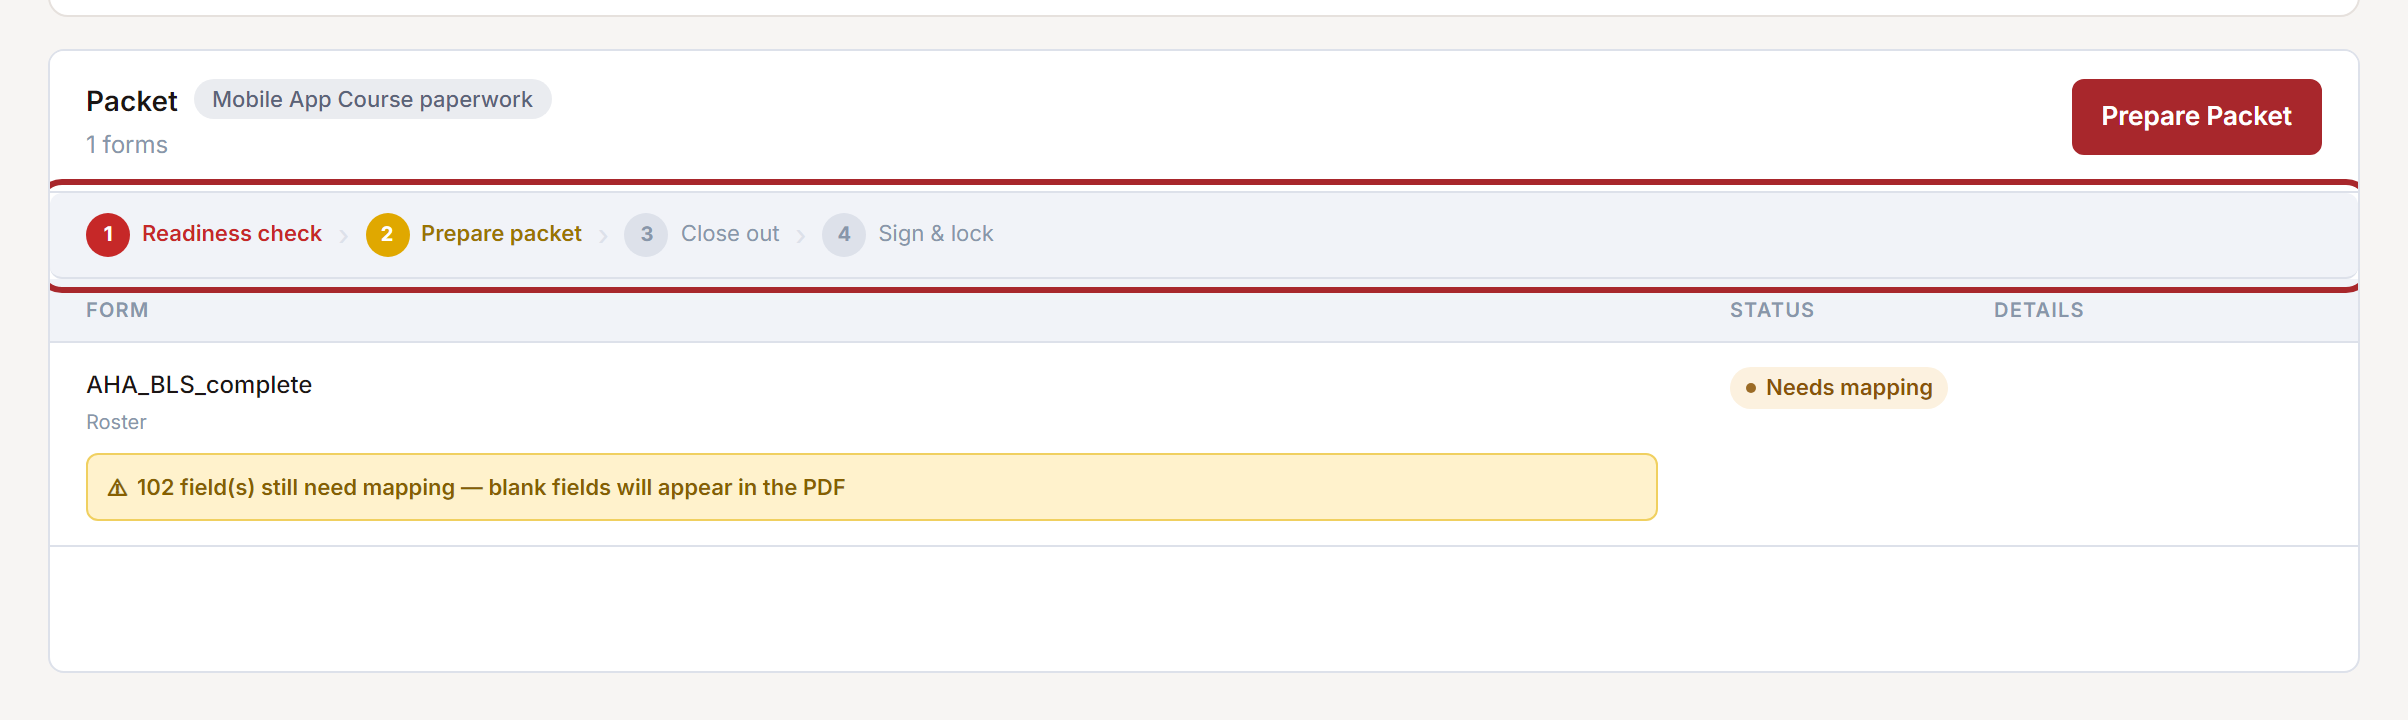
The Paperwork tab is where you prepare, complete, sign and export the paperwork for one class. When the course has a packet, it shows four steps across the top — Readiness check, Prepare packet, Close out and Sign & lock — and walks you through them in order.
Where to find it: Classes › open a class › Paperwork
Generate Class Paperwork
At the very top of the tab you will find Generate Class Paperwork, which produces your course's existing (older) paperwork for the class. This is the action that used to live on the class page; it now sits here so all of a class's paperwork is in one place. It is separate from the packet below, so it appears even when a course has no packet assigned.
Check readiness
The readiness list shows every form in the packet with its Status and any Details. A form reads Ready when it is good to go, No fields when it has nothing to fill and is completed by hand on the day, or Needs mapping when some of its fields still have to be matched. Separately, a form can show an Attention marker when some enrolled students are missing information that form needs — the list tells you how many students are affected and what is missing.
When a form needs attention, you can open the student's profile to add the missing detail, or choose Leave blank to continue without it. Choosing Leave blank clears that warning and is recorded in the class's activity log; you can Undo it while you are still on the page.
Prepare the packet (auto-fill)
Choose Prepare Packet to fill the forms for every enrolled student. The system generates the PDFs from your class and student data. You will be asked to confirm first, because it creates documents for all enrolled students. If any form still needs its fields matched, Prepare is unavailable until the matching is finished.
Re-prepare when the class changes
If anything about the class changes after you prepare — a student is added or removed, a time or location is edited — the packet shows Packet is stale. Choose Re-prepare Packet to fill it again with the latest information. You can re-prepare as many times as you need, up until you close the class out.
Add any late enrollments before you close out, then re-prepare, so the new students' forms are included. Once a packet is closed out and ready to sign, the re-prepare button is no longer shown.
Close out the class
When the class is finished, choose Close Out. This re-fills the packet with each student's final attendance and pass or fail result, then marks it Ready to Sign. (You cannot close out while a packet is stale — re-prepare it first.)
Sign and lock
When the packet is ready, choose Sign & Lock. An Electronic Signature window opens. Your name is shown on the signature, you draw your signature, and the date is recorded. Signing certifies that the information in the packet is accurate and complete, and that you consent to sign electronically under the federal ESIGN Act and applicable state UETA rules.
Signing locks the packet permanently. A locked packet cannot be edited or re-prepared; if you need to change it, you start a new packet. Make sure attendance and results are final before you sign. Only the class's lead instructor, an Admin or the Owner can sign.
Once signed, the packet shows Signed & Locked with a Signature Record — who signed it and when. All dates and times are shown in your organization's time zone.
Download the PDF
Choose Download PDF to save the finished packet as a single PDF. Each download is recorded in the class's activity log.
Export a roster for your training agency
After a packet is locked, an Export roster menu appears with three choices — AHA Atlas, Red Cross and HSI Otis. Each one downloads a CSV file for that agency's roster upload.
Before your first upload to Red Cross or HSI Otis, verify the column format with your agency coordinator, as each agency's template can differ.
Activity log
Each packet keeps an activity log — prepare, re-prepare, close out, leaving a field blank, signing and each download — with who did it and when. Open it from the Activity log section near the bottom of the tab.
What the colors mean
| Marker | Color | What it means |
|---|---|---|
| Ready | Green | The form is matched and ready to fill. |
| No fields | Grey | The form has nothing to fill; it is completed by hand on the day. |
| Needs mapping | Amber | Some fields still need to be matched before the packet can be prepared. |
| Attention | Amber | Some enrolled students are missing information this form needs. |
The four steps across the top use the same idea: a finished step is green, the step you are on is red, the next step is amber, and a packet that needs re-preparing is marked orange.
Add your own fillable forms
You can upload your own fillable PDF forms, match their fields to your data, and attach them to your courses so their classes include and fill them. Your uploaded forms stay in your organization.
Where to find it: Course Builder › Paperwork
Upload a form
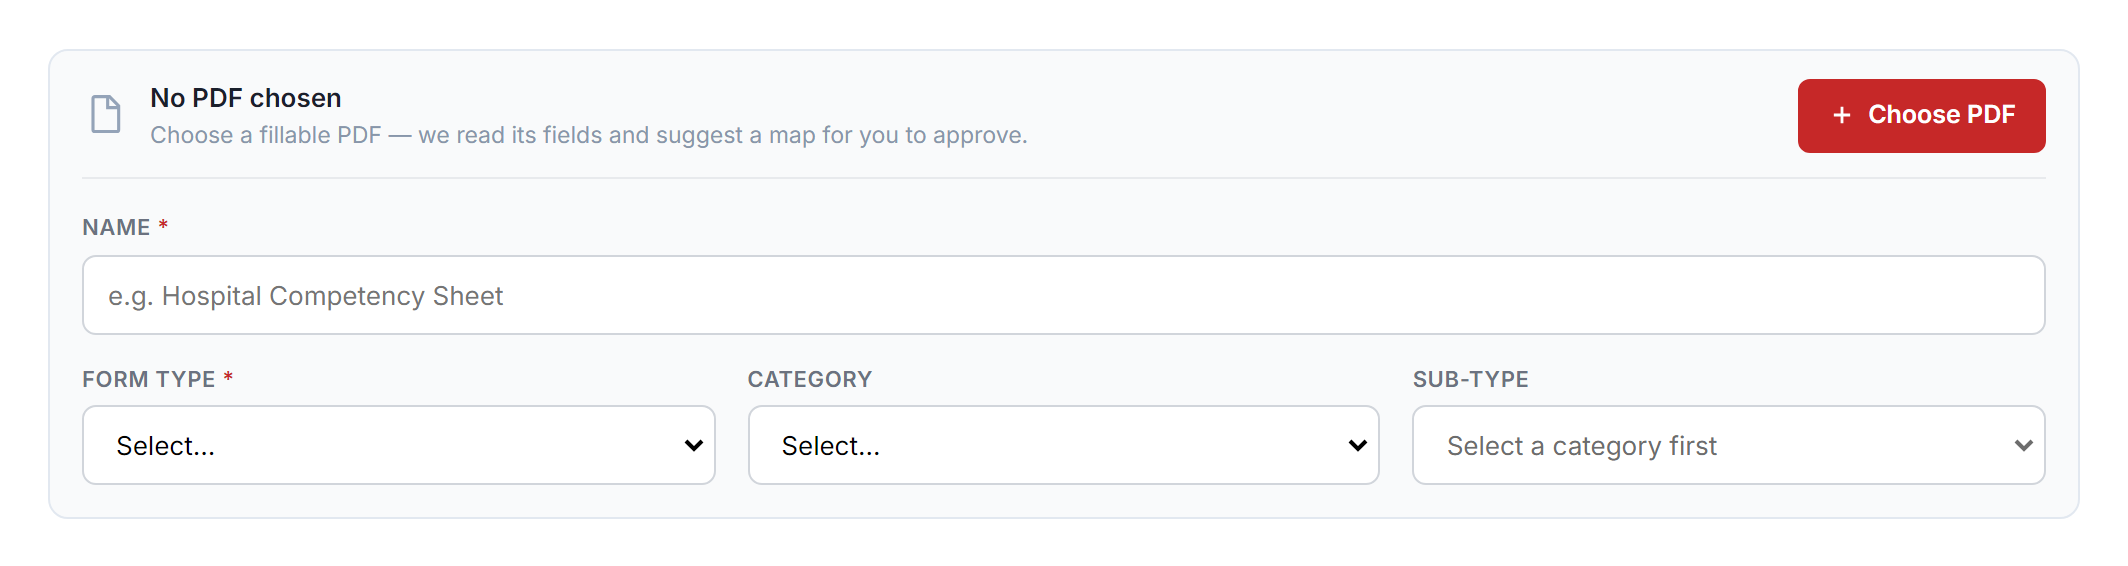
Choose New paperwork and select a fillable (AcroForm) PDF. Give the form a Name and a Form type (Course rosters, Per-Student Testing, Per-Student Certificate, Flat Form or Reference), and optionally a Category and Sub-type. Then choose Upload & map.
Review the field matches
After upload, you see each field in your PDF next to the data it will be filled with. Common fields are matched for you. For each suggested match you can choose Approve, or use Approve all to approve every suggestion at once. The bar at the top shows how many fields are matched and approved, with a confidence score on each pending row.
A field that was not matched shows — leave blank —. You can leave it blank, or pick the data it should use from the list. If a PDF has no fillable fields, there is nothing to match and it is printed as-is.
Attach the form to your courses
On the next step, Course Templates, choose one or more of your active courses to attach the form to. Their classes will then include and fill it. You can select several courses at once (hold Ctrl, or ⌘ on a Mac).
You can also wrap the form with an existing packet: this makes a copy of that packet for your organization with your form inserted, and you can order your form within it. Choose Attach (or Create packet & attach if you wrapped it with a packet). You can attach to more courses, then choose Done when you have finished.
Preview and copy
Use Preview at any time to see the exact PDF, page by page. To start from a form you already have, use Use Existing PaperWork to copy a form; the copy opens so you can re-match its fields and save it under a new name. An older canvas form offers Convert to fillable instead, which keeps the original and adds a fillable version.
Online class evaluations
You can collect class evaluations online. You build an evaluation form, choose it for a course, and students fill it in from their own account after the class. You then review the answers from the class's Paperwork tab.
Build an evaluation form
Create and edit your evaluation forms in Enrollment Settings. Open the Evaluation Forms tab and build a form with the questions you want to ask, using the same builder as registration forms.
Where to find it: Enrollments › Enrollment Settings › Evaluation Forms
Choose a form for a course
On a course, pick which evaluation form its classes use with the Evaluation Form selector, next to the Registration Form selector. Every class of that course then offers the evaluation.
Where to find it: Course Builder › Courses › open a course › Evaluation Form
What the student does
Students fill in the evaluation from their own account — there is no link to generate or share. After a class is completed, a Feedback action appears next to that class in the student's enrollments. They open it, answer the questions and submit. Once they have submitted, they see a read-only copy of their own answers, and cannot submit again.
Where the student finds it: Enrollments › My Enrollments › Feedback (on a completed class)
A student is always signed in to give their own feedback, so one student can never answer for another.
View the results
Review the answers in the class's Paperwork tab, in the Online evaluations panel. Click the heading to load the results, then search by student or answer, sort by name or most recent, and expand each student to read their answers. The panel is read-only, and it appears only when the course has an evaluation form.
Where to find it: Classes › open a class › Paperwork › Online evaluations
Permissions
Access is set per role on the Roles & Permissions screen.
Where to find it: Settings › Roles & Permissions
- The class Paperwork tab is shown to staff roles when Smart Paperwork is turned on for your organization. It is never shown to students.
- Signing a packet is limited to the class's lead instructor, an Admin or the Owner. Preparing, closing out, downloading and exporting are available to staff who can open the tab.
- Adding and managing your own forms uses the Course Builder paperwork (Document Library) permissions — Add, Edit, Delete and Download.
- Seeing other people's evaluation answers uses View Class Feedback (under the same Course Builder paperwork permissions). A student needs no permission to give or see their own feedback.
- The paperwork inbox (submitting, approving and rejecting the older course paperwork) uses the Paperwork Inbox permissions — Submit, Approve and Reject.
Troubleshooting and FAQ
“No paperwork is assigned to this course”
The course does not have a packet of forms yet. Attach a form to the course yourself from Course Builder › Paperwork (attaching creates the packet), or contact CPR Enroll support to assign a shared packet to that course.
A form says “Needs mapping”
Some of that form's fields still need to be matched to your data before the packet can be prepared. For a form your organization added, open it from Course Builder › Paperwork and finish the field matching yourself, then approve it. A shared form provided by CPR Enroll is matched by our support team — contact support if one still needs mapping.
The packet is out of date after I added a student
The packet shows Packet is stale whenever the class changes after you prepared it. Choose Re-prepare Packet to fill it again with the latest students and details. Do this before you close the class out.
The Paperwork tab is missing
The tab appears only for organizations that have Smart Paperwork turned on, and only for staff roles — students never see it. If you expect it and do not see it, check that you are signed in with a staff role.
I can't edit a packet after signing
This is expected. Signing locks the packet permanently so the signed record cannot change. If something needs to be different, start a new packet for the class.
My export won't upload to the agency
Each agency expects its own column format. Use the matching export — AHA Atlas, Red Cross or HSI Otis — and, before your first upload to Red Cross or HSI Otis, confirm the column format with your agency coordinator.
The downloaded packet looks empty
A packet only fills fields that are matched and approved, and only for students whose information is complete. If a form still needs matching, or students are missing details the form needs, finish those first (or choose Leave blank for missing details), then re-prepare before downloading.
A student says they can't find the evaluation
The Feedback action appears next to a class in the student's enrollments only after the class is completed (its roster finalized), and only when the course has an evaluation form chosen. Check both.
Was this article helpful?