CPR Enroll+ has a built-in invoicing system that lets you bill corporate clients, individual students, or any other customer directly from the platform. Invoices can be created with custom line items, rich-text terms and notes, and a PDF preview before sending. This is ideal for B2B training contracts, group class billing, or any situation where a student or client needs a formal invoice rather than an automated payment receipt.
This article walks you through creating an invoice, adding line items and notes, and tracking invoice status.

Before You Begin
- Know who you're billing — have the recipient's name, email, or organization details ready.
- Decide which courses, certifications, or products you're invoicing for.
- Consider pre-building reusable line items for services you bill regularly (see Your NEW Setup Guide: Create Reusable Invoice Line Items).
Step-by-Step Instructions
Step 1: Navigate to Payments
From the CPR Enroll Sidebar Menu, locate the Payments option in the sidebar, situated directly below "Enrollments."
Step 2: Access the Invoices Section
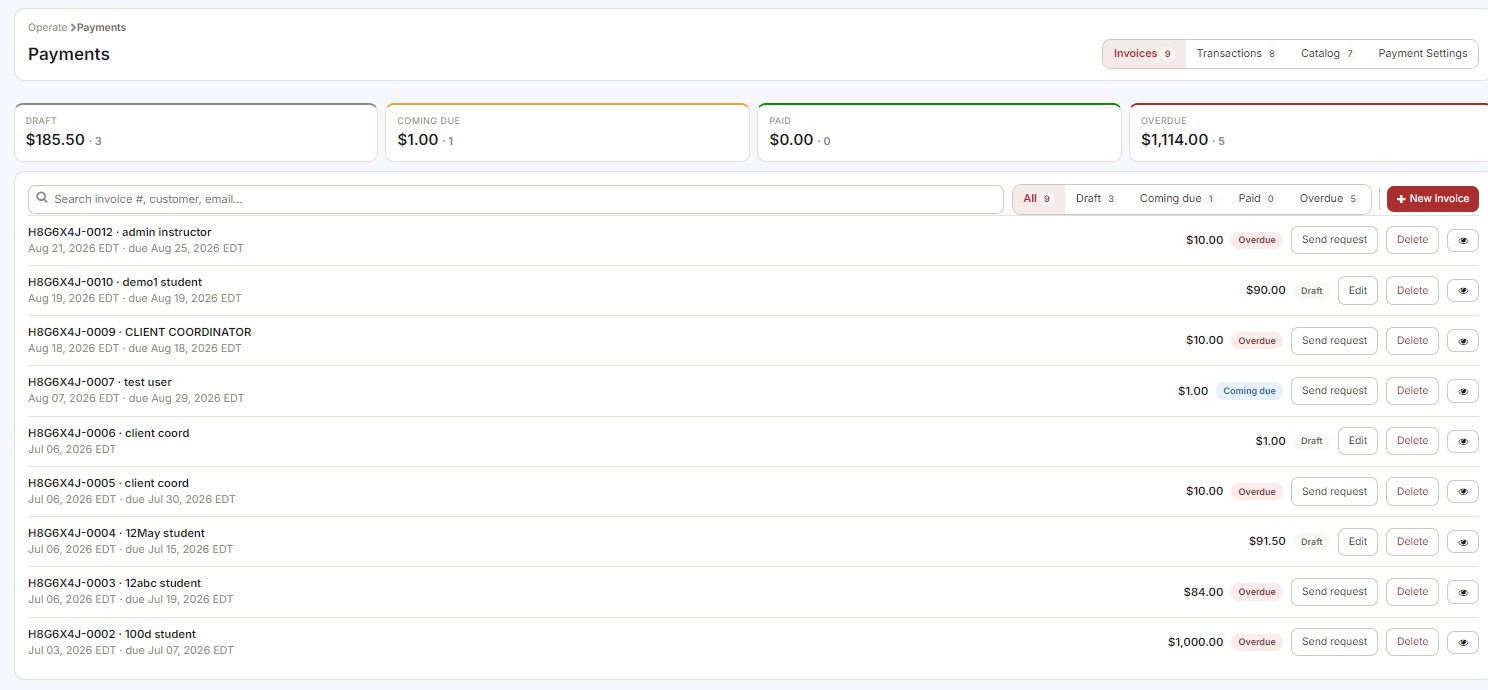
Once clicked, you will be redirected to the Invoices section. This central hub allows you to view your full Invoice List, track payment statuses, and review specific billing details at a glance.
Step 3: Start a New Invoice
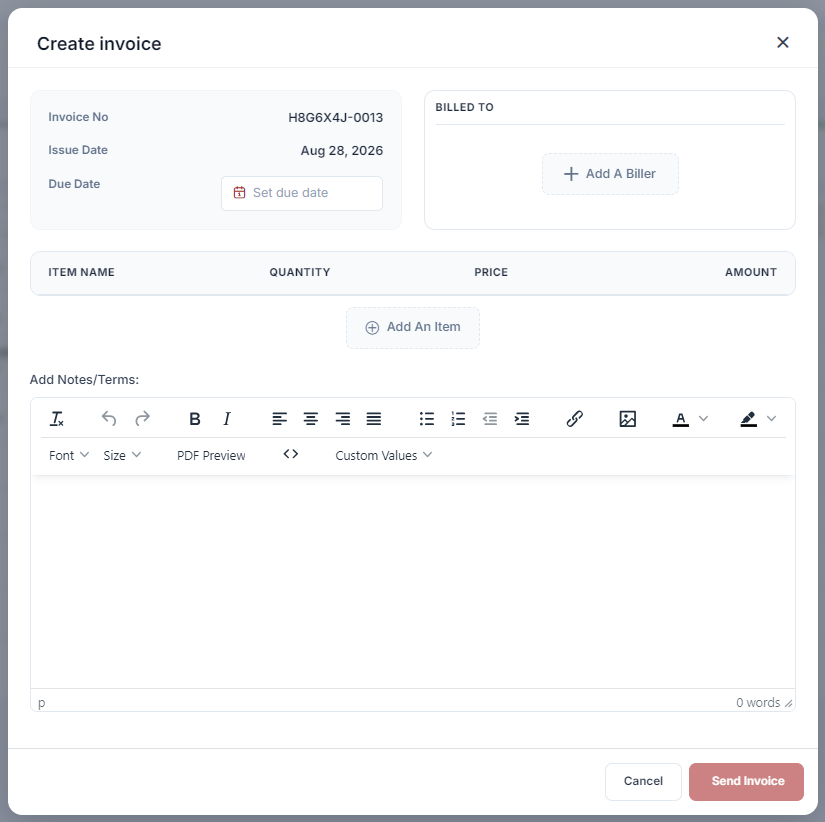
Look for the + New Invoice button. Clicking this will open the Create Invoice interface.
Step 4: Review Automatic Data Entry
For your convenience, the Invoice Number and Issue Date are automatically generated and set to the current date, saving you manual entry time.
Step 5: Set the Due Date
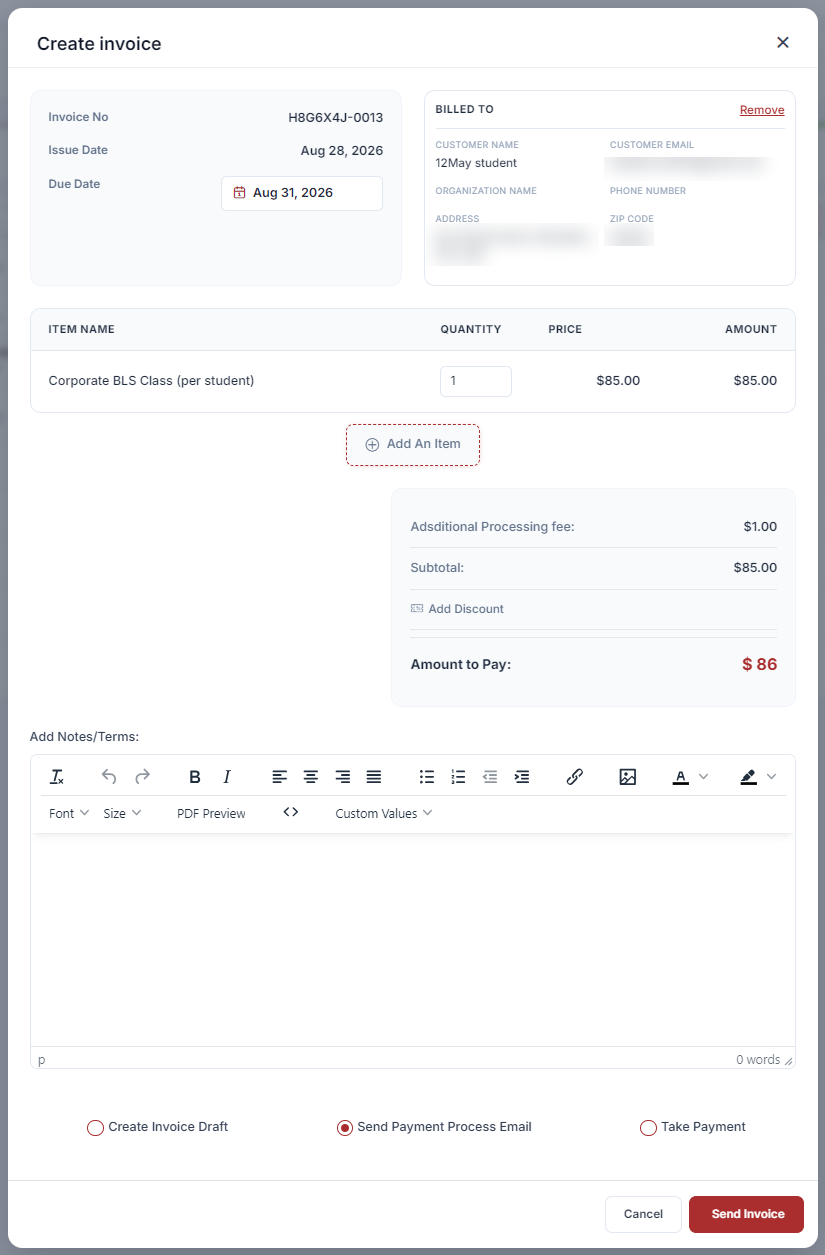
To establish a payment timeline, click the Set due date button and select the appropriate deadline from the calendar.
Step 6: Identify the Recipient
In the Billed To section, click + Add A Biller to select or enter the details of the individual or organization receiving the invoice.
Step 7: Add Products or Services (Line Items)
- Click + Add An Item to list the specific courses, certifications, or products you are billing for.
- In the Items section, click the Items dropdown to select from your pre-defined reusable items (see Payments > Catalog > Items to create these), or click Add Custom Item to enter a description, quantity, and rate manually.
- Add as many line items as needed — the invoice totals update automatically.
- Apply a tax rate from the Tax dropdown if applicable.
✔ Save time with reusable items: Create your most common billing items (e.g., "BLS Provider Class — Per Seat", "Instructor Fee") in Payments > Catalog > Items. They then appear in the Items dropdown on every invoice, saving you from typing the same descriptions repeatedly.
Step 8: Add Notes and Terms
- Use the Notes field (rich text) to add any customer-facing notes — payment instructions, thank-you messages, or class-specific details.
- Use the Terms field (rich text) to include your payment terms, late payment policy, or legal language.
- Both fields support Custom Values merge fields — click the Custom Values button in the editor toolbar to insert dynamic data such as your organization name, address, or contact details.
Step 9: Preview and Send the Invoice
- Click Preview to see the invoice as a PDF before sending. Review for accuracy.
- Click Save to save the invoice as a Draft, or click Send Invoice to deliver the document directly to your client's inbox.
- To send a previously saved draft, use the send/email action from the invoice row in the Invoices list.
Tracking Invoice Status
The Invoices list view shows four status summary cards at the top:
| Status | What It Means |
|---|---|
| Draft | Saved but not yet sent. |
| Coming Due | Sent and approaching the due date. |
| Paid | Payment has been received. |
| Overdue | Past the due date and unpaid. |
Best Practices
- Build reusable items for your most common billing scenarios so invoicing stays fast and consistent.
- Always preview the PDF before sending to catch errors in billing details or line items.
- Use the Notes and Terms fields with Custom Values merge fields so your invoices stay accurate even as organization details change.
- Check the Overdue and Coming Due summary cards regularly to stay on top of outstanding payments.
Frequently Asked Questions
| Question | Answer |
|---|---|
| Do I have to fill in the Invoice Number and Issue Date manually? | No. Both are automatically generated and set to the current date when you start a new invoice. |
| Can I save an invoice without sending it? | Yes. Click Save to store it as a Draft, then send it later from the Invoices list. |
| What's the difference between the Notes field and the Terms field? | Notes are typically customer-facing details like payment instructions or a thank-you message, while Terms cover payment terms, late payment policy, or legal language. |
✔ You're all set. Your invoice is created and on its way to your client, and you know how to track its status from Draft through Paid.
Was this article helpful?
That’s Great!
Thank you for your feedback
Sorry! We couldn't be helpful
Thank you for your feedback
Feedback sent
We appreciate your effort and will try to fix the article