This article covers two key integrations for your CPR Enroll account: Stripe for payment processing and ResQEngage for marketing automation. Both integrations extend the platform's capabilities significantly — Stripe enables online payments, and ResQEngage allows you to automate follow-up communications and manage your marketing pipeline.
Connecting Stripe
Before You Begin
- A business or personal email address you'd like associated with your payment account.
- Basic business information, such as your business name, address, and tax ID (if applicable), since Stripe may request these during account verification.
- Authorization to complete this step on behalf of your business. If you're setting this up for a business, the form must be completed by the business owner or someone with significant management responsibility for that business.
Setup takes about 5 minutes, though Stripe may occasionally request additional verification information depending on your business type and location.
Step 1: Open Your Setup Guide
- From the left-hand menu, click Settings.
- Click Setup Guide.
You'll land on Your Setup Guide, where you can finish setting up your account with everything you need to sell and operate.
Step 2: Locate Connect Payments
Under 1. Get Sell-Ready, find Connect Payments and click Connect.
This opens the Connect Payments screen, which is where you'll link your account to Stripe so you can begin accepting online payments. Connecting here links your CPR Enroll account directly to Stripe, enabling you to accept card payments for class enrollments.
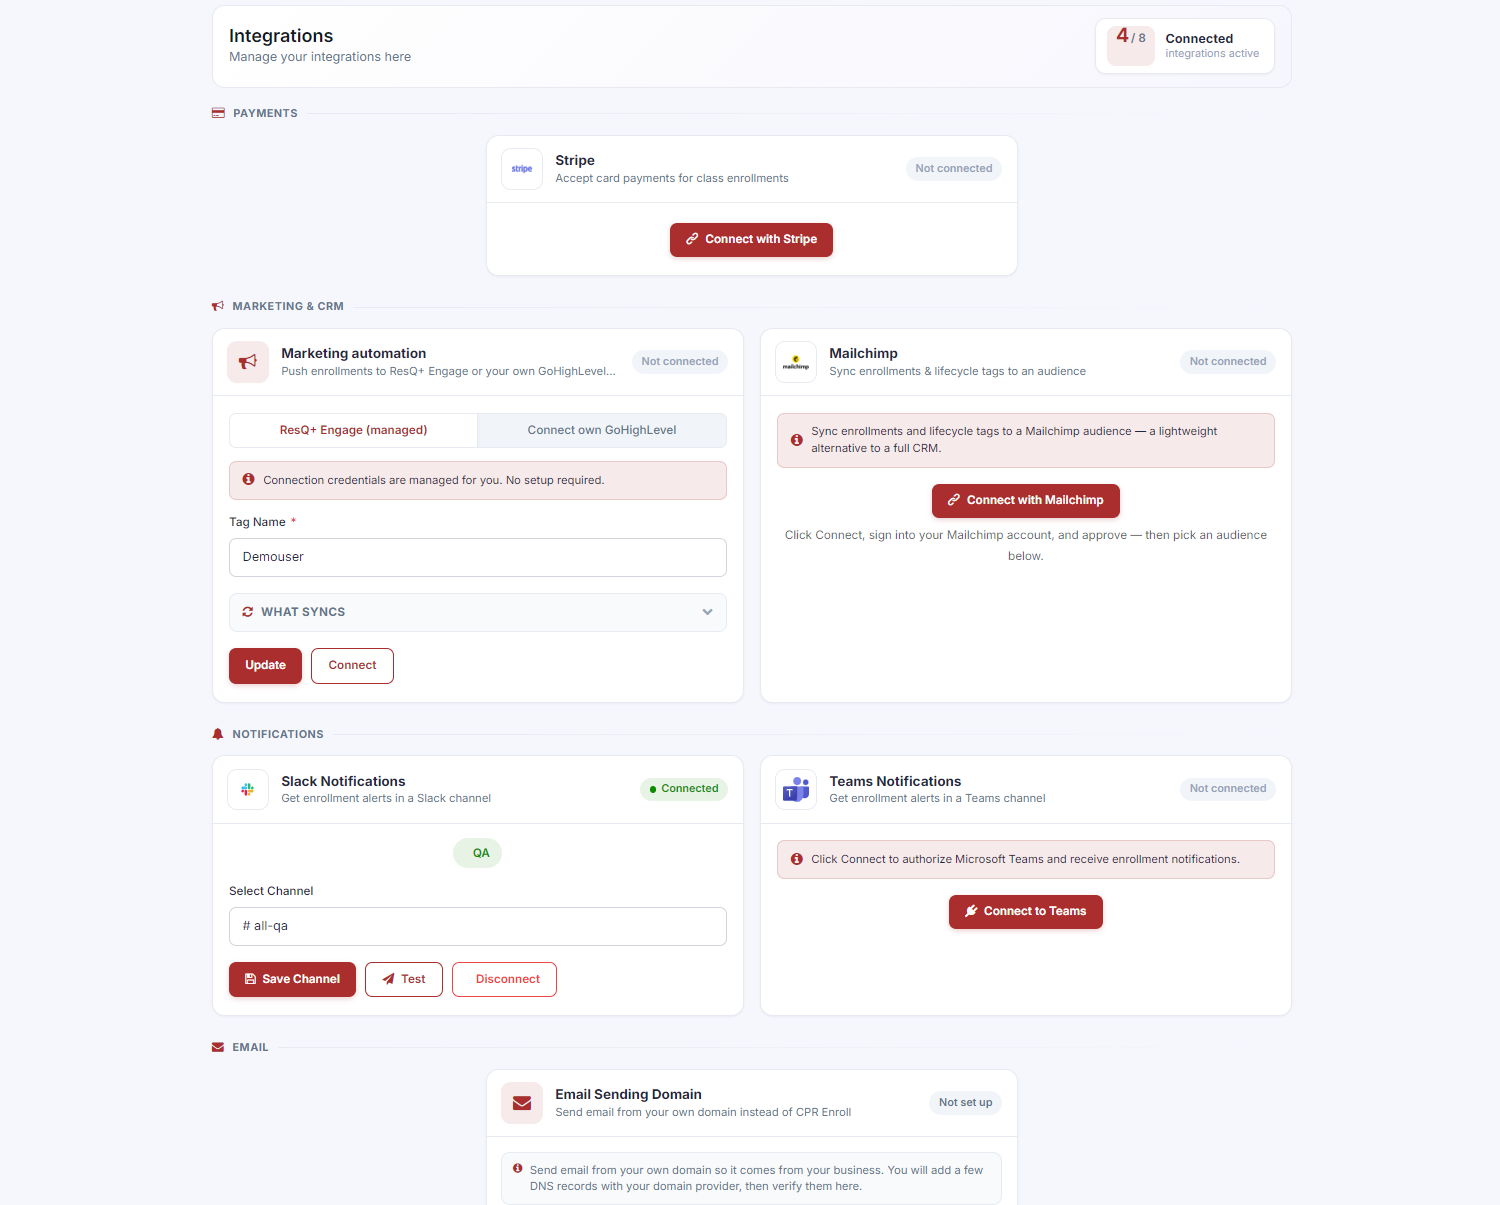
✔ Another way to get here. Once your account is set up, you don't need to go through the Setup Guide every time. You can also connect or manage Stripe from Settings → Integrations & Connections, which opens the Integrations page and shows Stripe alongside your other connected services.
Step 3: Start the Stripe Connection
Click Connect with Stripe. You'll be redirected to Stripe's secure connection page. CPR Enroll partners with Stripe to keep every transaction safe and secure, so none of your payment details are stored directly on CPR Enroll's servers.
✔ Note: If you're completing this on behalf of a business, the form must be completed by the business owner or someone with significant management responsibility for that business. Stripe uses this information to verify the account and remain compliant with financial regulations.
Step 4: Enter Your Email Address
On the Get Started with Stripe screen, enter your email address.
- Already have a Stripe account? Use the same email already on file with Stripe to link your existing account instead of creating a duplicate.
- New to Stripe? Enter the email you'd like to use, then click Continue to proceed with account creation.
Step 5: Complete Stripe's Verification Steps
Depending on your business type, Stripe may ask for additional details such as your business classification, banking information for payouts, or identity verification documents. Follow the on-screen prompts to complete this process.
Step 6: Confirm the Connection
Once you've completed Stripe's setup steps, you'll be returned to CPR Enroll, where your account status will reflect that payments are connected.
Connecting ResQEngage
- From the left-hand menu, go to Settings → Integrations & Connections, and look for the ResQEngage integration option.
- Enter your Tag Name and click Update, then click Connect to link your ResQEngage account.
- Configure which data to sync — typically student enrollment events, contact creation, and class completion triggers.
- Test the integration by creating a test enrollment and verifying the lead appears in your ResQEngage account.
⚠ Verify current ResQEngage setup location. The exact location of the ResQEngage integration settings may vary based on your CPR Enroll account configuration. If you cannot find the ResQEngage option in the location described above, contact support@cprenroll.com for guidance specific to your account.
Best Practices
- Use your official business email when connecting Stripe, rather than a personal email, to keep financial records and support communications organized.
- Keep your Stripe login credentials secure, since this account handles your payment processing and payout information.
- Double-check your payout bank details during Stripe setup to avoid delays in receiving funds.
- Revisit the Connect Payments screen anytime if you need to update your connected Stripe account or review your payment status.
Troubleshooting Connection Issues
| Issue | What to Do |
|---|---|
| Stripe not connecting | Verify your Stripe account is fully set up and verified (identity verification complete). Unverified Stripe accounts cannot accept live payments. |
| Stripe shows disconnected after setup | Try the connection flow again from Settings → Setup Guide → Connect Payments. If the issue persists, contact support. |
| ResQEngage data not syncing | Confirm your ResQEngage Tag Name and credentials are correct and have not expired. Check ResQEngage's activity log for any sync errors. |
Frequently Asked Questions
| Question | Answer |
|---|---|
| Do I need a Stripe account before starting this process? | No. If you don't already have one, you can create a Stripe account directly during this setup by entering your email and following the prompts. |
| Can I use a personal Stripe account for my business? | The connection form must be completed by the business owner or someone with significant management responsibility for the business, so make sure the correct authorized person completes this step. |
| How long does it take to connect Stripe? | The guided setup typically takes about 5 minutes, though Stripe may request additional verification depending on your business type, which could take longer to process. |
| Is my payment information secure? | Yes. CPR Enroll partners with Stripe, a PCI-compliant payment processor, to ensure all transactions and sensitive payment data are handled securely. |
✔ You're all set. Once connected, your CPR Enroll account will be ready to accept online payments for class enrollments, and your ResQEngage integration will keep your marketing pipeline in sync with student activity.
Was this article helpful?
That’s Great!
Thank you for your feedback
Sorry! We couldn't be helpful
Thank you for your feedback
Feedback sent
We appreciate your effort and will try to fix the article