
Once your courses, locations, and classes are set up, you'll need a simple way for students to find and register for them. The Share Registration screen gives you one unified page — showing all your upcoming classes — that you can share directly or embed on your own website.
This article walks you through finding, sharing, and embedding your registration link.
Before You Begin
Before sharing your registration link, make sure:
- Your classes are scheduled and visible on your calendar, since the registration page displays upcoming classes automatically.
- You've decided where you'll share this link — for example, in email campaigns, social media, or embedded directly on your website.
- If embedding on your own site, you have access to edit your website's HTML or a website platform that supports embedding JavaScript widgets or iFrames.
Step-by-Step Instructions
Step 1: Open Your Setup Guide
- From the opening screen, click Settings on the left menu.
- Click Setup Guide.
You'll land on Your Setup Guide, where you can finish setting up your account with everything you need to sell and operate.
Step 2: Share Your Registration Link
Under 1. Get Sell-Ready, click Share Your Registration Link.
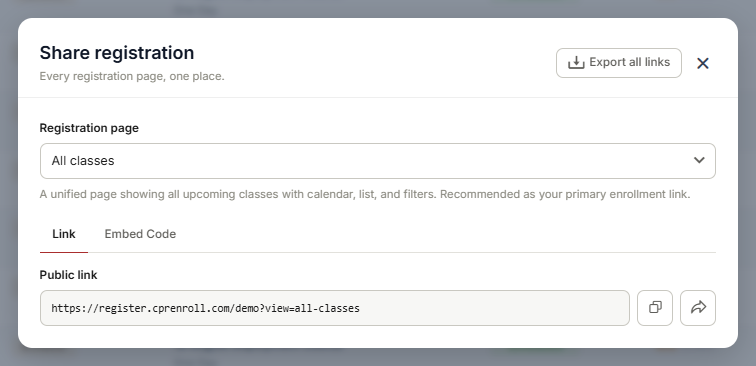
This opens the Share Registration screen — every registration page, in one place.
✔ Quickest way to find it. Once your account is fully set up, you don't need to go through the Setup Guide every time. Click your username in the lower left of the screen, click the ^ arrow, then select Share Registration. From there, you can choose which share page you'd like to use.
Step 3: Choose Your Registration Page
Select the Registration Page to share. This is a unified page showing all your upcoming classes, complete with calendar, list, and filter views. It's recommended as your primary enrollment link.
From here, you can:
- Copy Link — copy the public registration link to share directly with students.
- Open in New Tab — preview the public page yourself.
Step 4: Embed on Your Own Website (Optional)
If you'd rather display your classes directly on your own site, copy the embed code using either:
- JavaScript Widget
- iFrame
Paste the code once, wherever you'd like the widget to appear. It's mobile-friendly, and you can place multiple widgets on the same page if needed.
Best Practices
- Use the direct link for quick sharing, such as in emails, social posts, or text messages, since it requires no setup.
- Use the embed option for a seamless website experience, so students never have to leave your site to register.
- Test your embedded widget on both desktop and mobile after adding it to your website, to confirm it displays correctly.
- Bookmark or save your registration link somewhere convenient, since you'll likely reuse it often across marketing materials.
Frequently Asked Questions
| Question | Answer |
|---|---|
| What's the difference between the JavaScript Widget and iFrame options? | Both let you embed your class listings on your own website. The JavaScript Widget typically offers more flexible styling integration, while the iFrame embeds the page directly as a self-contained frame. Either option is mobile-friendly. |
| Can I place more than one widget on the same page? | Yes. You can place multiple widgets on a single page if needed — for example, to show classes from different categories in different sections of your site. |
| Will the registration page update automatically as I add new classes? | Yes. The Registration Page reflects your upcoming classes automatically, so there's no need to update the link or embed code when your schedule changes. |
| Can I share this link on social media? | Yes. Since it's a standard public URL, you can share it anywhere — social media, email campaigns, printed materials, or your website. |
✔ You're all set. Your registration link is ready to share — whether by copying the direct link, or embedding it on your own website for a seamless enrollment experience.
Was this article helpful?
That’s Great!
Thank you for your feedback
Sorry! We couldn't be helpful
Thank you for your feedback
Feedback sent
We appreciate your effort and will try to fix the article