Publishing clear Terms and Conditions for your training classes protects your business and ensures students understand your policies before they enroll. CPR Enroll+ lets you add Terms and Conditions text that students must acknowledge during the registration checkout process.
This article walks you through adding Class Terms & Conditions, linking to an external terms page, and configuring separate terms for store purchases.
Before You Begin
- Decide whether you'll write your terms directly in CPR Enroll+, link to a page already hosted on your own website, or do both.
- Gather any specific language required by your certification body.
- Note that Class Terms & Conditions and Store Terms & Conditions are configured separately.
Step-by-Step Instructions
Step 1: Add Class Terms & Conditions
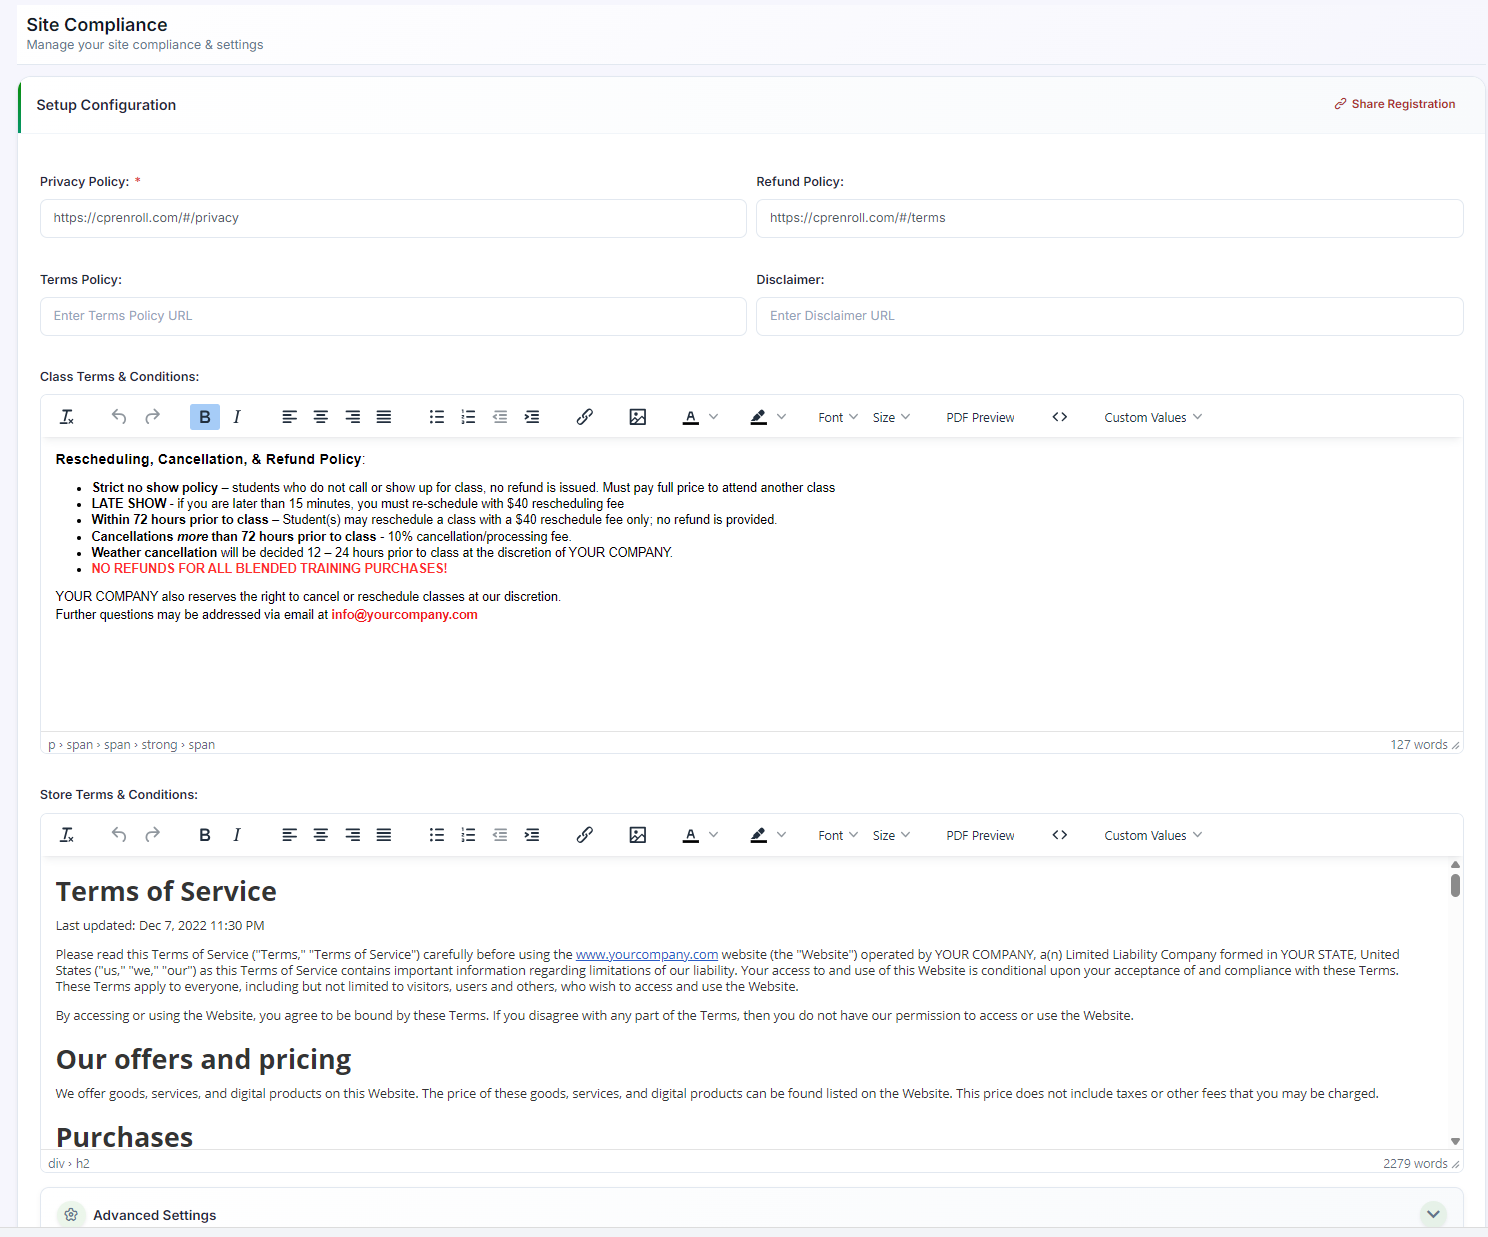
- From the sidebar, go to Settings > Site Compliances.
- Scroll to the Class Terms & Conditions field.
- Use the rich text editor to write or paste your terms. You can include formatting, links to external policy pages, and any specific language required by your certification body.
- Click Save.
Step 2: Link to an External Terms Page (Optional)
If your terms and conditions are hosted on your own website, you can link to them instead of — or in addition to — writing them in the editor:
- In Settings > Site Compliances, find the Terms Policy field.
- Enter the full URL of your terms page (e.g.,
https://yourwebsite.com/terms). - Click Save. A link to your terms page will appear in the student checkout flow.
Step 3: Configure Store Terms & Conditions
Separate terms can be configured for store purchases. In Settings > Site Compliance, look for the Store Terms & Conditions field and complete it following the same steps above.
ℹ When are terms shown to students? Class Terms & Conditions appear on the student registration checkout page — students must check a confirmation box before they can complete enrollment. Store Terms & Conditions appear at store checkout. Students who enroll via manual admin enrollment do not go through the checkout flow and therefore do not see the terms during that process.
Best Practices
- Include any language your certification body specifically requires, not just general boilerplate terms.
- Keep Class and Store Terms & Conditions up to date separately — updating one does not update the other.
- If you maintain a terms page on your own website, keep the linked URL current so students always see your latest policy.
- Remember that manually enrolled students bypass checkout and won't see the terms, so communicate policies to them another way if needed.
Frequently Asked Questions
| Question | Answer |
|---|---|
| Can I both write terms in the editor and link to an external page? | Yes. The Terms Policy URL field and the Class Terms & Conditions editor can be used together or independently. |
| Do Class Terms and Store Terms use the same setting? | No. They are configured separately — Class Terms & Conditions cover class registration, while Store Terms & Conditions cover store purchases. |
| Will students who are manually enrolled by an admin see the terms? | No. Manual admin enrollment does not go through the checkout flow, so those students do not see the terms during that process. |
✔ You're all set. Your Terms and Conditions are now live and will be presented to students during registration and store checkout.
Was this article helpful?
That’s Great!
Thank you for your feedback
Sorry! We couldn't be helpful
Thank you for your feedback
Feedback sent
We appreciate your effort and will try to fix the article