Scheduling a class brings everything together — your course, instructor, location, and pricing — into a bookable session that students can register for. This article walks you through every section of the Create Class window, from basic details through timing and class notes.
Before You Begin
Since scheduling a class pulls together several other setup pieces, make sure you've already completed:
- Adding your course(s)
- Adding your location(s)
- Adding your instructor(s)
- Setting up any keycode banks or reschedule rules you plan to use for this class
Having these in place beforehand makes the class creation process much faster, since you'll be selecting from existing options rather than pausing to set them up mid-way.
Step-by-Step Instructions
Step 1: Open Your Setup Guide
- From the opening screen, click Settings on the left menu.
- Click Setup Guide.
You'll land on Your Setup Guide, where you can finish setting up your account with everything you need to sell and operate.
Step 2: Schedule a Class
Under 1. Get Sell-Ready, click Schedule a Class.
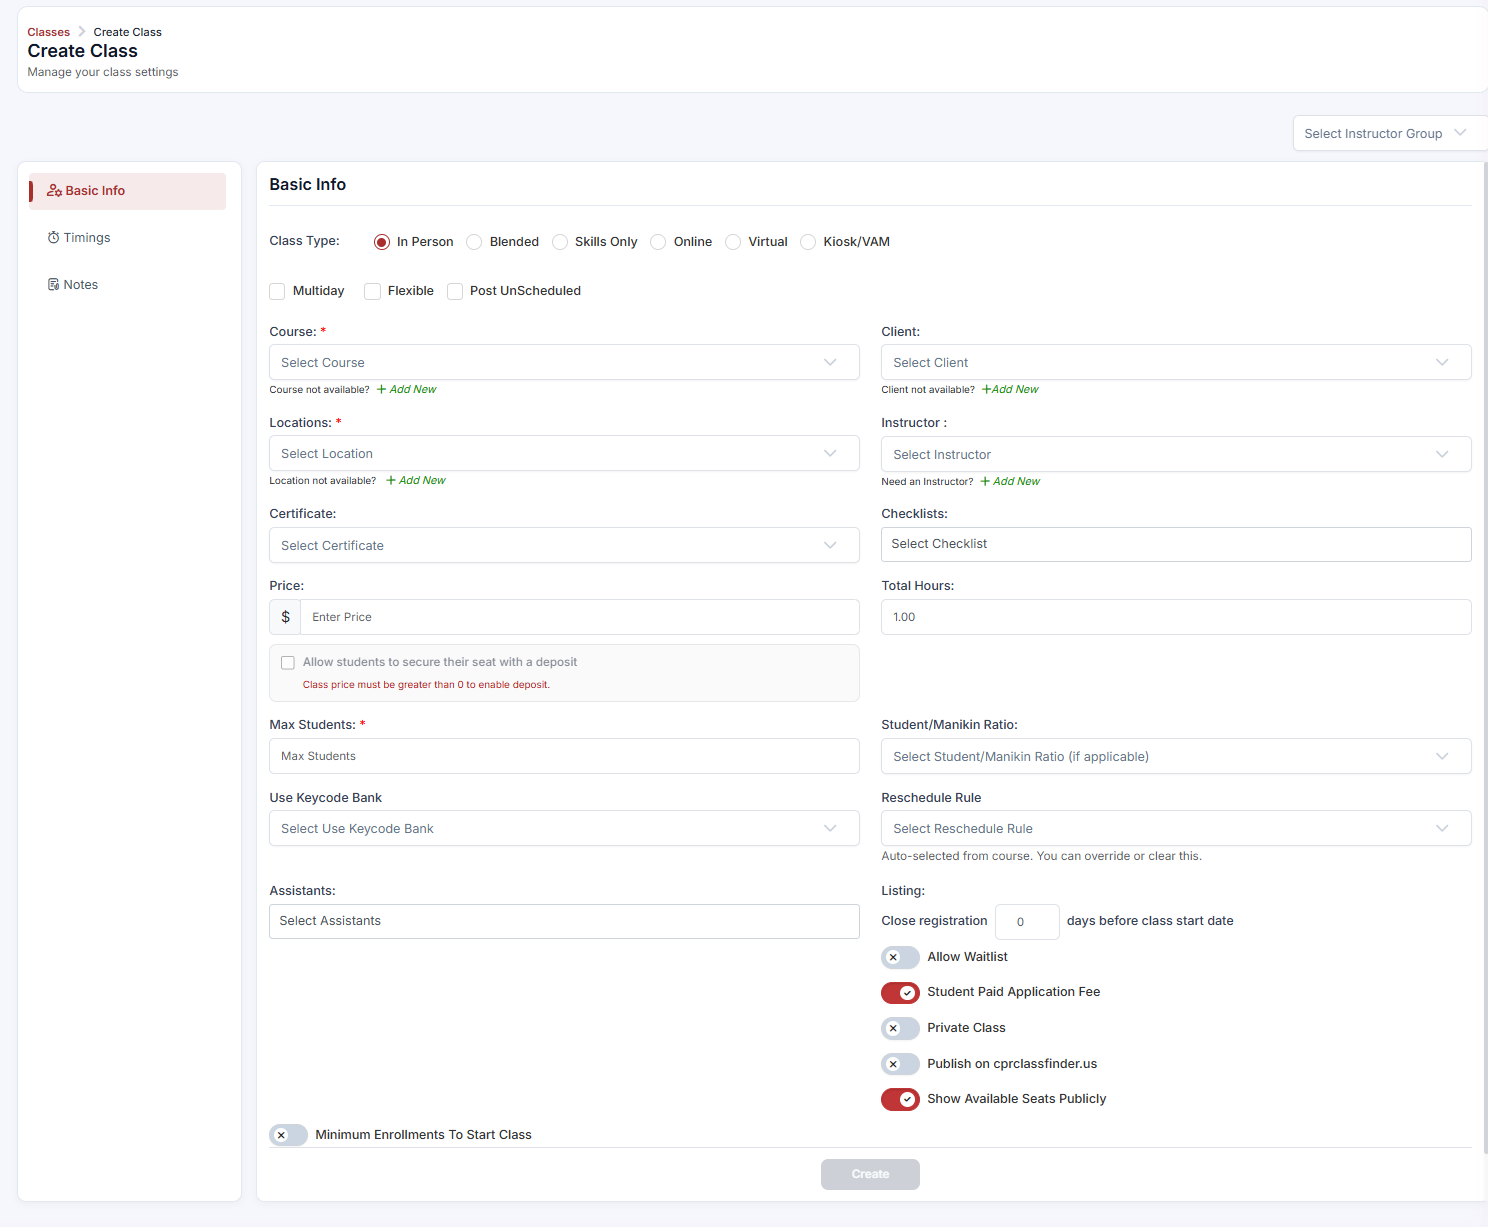
You'll be directed to the Upcoming Classes page. From here, click + Create Class. This opens the Create Class window, where you can manage your class settings.
Step 3: Complete Basic Info
Fill out the following details:
- Class Type — choose from: In Person, Blended, Skills Only, Online, Virtual, Kiosk, Multiday, Flexible, or Post Unscheduled.
- Course — select the course.
- Client — select the client.
- Location — select the location.
- Instructor — select the instructor.
- Certificate — select the certificate.
- Checklist — select the checklist.
- Price — enter the class price.
- Total Hours — enter the total class hours.
✔ Deposits: You can toggle Allow students to secure their seat with a deposit. Note that the class price must be greater than $0 to enable this option.
Step 4: Set Capacity & Rules
- Max Students — enter the maximum number of students.
- Student/Manikin Ratio — enter a ratio, if applicable.
- Use Keycode Bank — select a keycode bank, if applicable.
- Reschedule Rule — select the reschedule rule.
- Assistants — select any assistants for the class.
Step 5: Configure Registration Settings
- Close Registration — under Listing, choose how many days before the class start date registration should close.
You can also toggle any of the following:
- Allow Waitlist
- Student Paid Application Fee
- Private Class
- Publish on cprclassfinder.us
- Show Available Seats Publicly
- Minimum Enrollments to Start Class
Once everything looks good, click Create to finalize this section.
Step 6: Set Timings
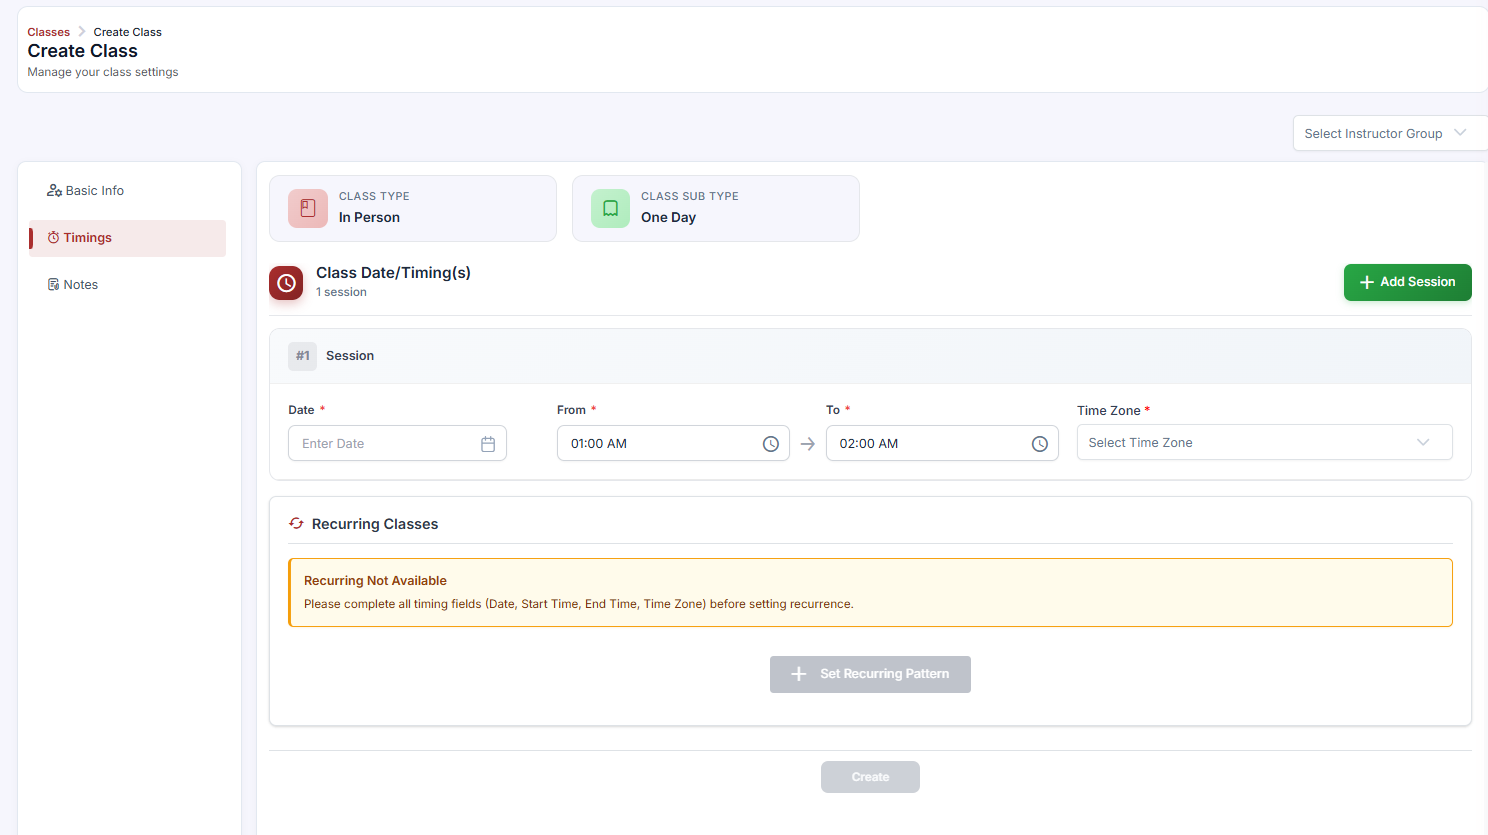
Under Timings, you can set:
- Dates per Session — choose the start and end times for each session.
- Time Zone — select the applicable time zone.
- Recurring Classes — set up a recurring schedule, if needed.
Click Create to finalize your timing settings.
Step 7: Add Class Notes (Optional)
You can also add Class Notes, which can be set to:
- Public — visible to students.
- Internal — visible only to internal team members.
Best Practices
- Set your Max Students and Student/Manikin Ratio together, so your class capacity accurately reflects your equipment availability.
- Use Minimum Enrollments to Start Class for classes where running with too few students isn't cost-effective, so you're notified in time to make adjustments.
- Reserve Private Class and Show Available Seats Publicly settings for special cases, such as corporate bookings or invite-only sessions, since these change how visible the class is to the public.
- Use Internal Class Notes for scheduling or logistics details that shouldn't be visible to students, and Public Notes for information students need to know before class (e.g., what to bring).
- Double-check your time zone when scheduling classes across multiple locations, to avoid confusion for students in different regions.
Frequently Asked Questions
| Question | Answer |
|---|---|
| Why can't I enable the deposit option? | Deposits require the class price to be greater than $0. If the price field is set to $0, this toggle will remain unavailable. |
| What's the difference between Public and Internal Class Notes? | Public notes are visible to students, while Internal notes are visible only to your internal team members — useful for logistics or reminders that shouldn't be shared externally. |
| Can I set up a recurring class schedule? | Yes. Under Timings, you can configure Recurring Classes so the same class repeats automatically according to your chosen schedule. |
| What happens if enrollment falls below the Minimum Enrollments to Start Class? | This setting is primarily informational — it flags classes at risk of low enrollment so you can decide whether to proceed, reschedule, or notify students. |
| Does Publish on cprclassfinder.us affect anything else? | Enabling this option makes the class visible on cprclassfinder.us, extending your reach beyond your own registration page. |
✔ You're all set. Your class is now scheduled and ready for students to enroll. You can return anytime to edit class details, timing, or registration settings.
Was this article helpful?
That’s Great!
Thank you for your feedback
Sorry! We couldn't be helpful
Thank you for your feedback
Feedback sent
We appreciate your effort and will try to fix the article