CPR Enroll+ includes three special built-in default locations — Client Location, Student Location, and Mobile Location — that handle training scenarios where the venue is not a fixed, pre-saved address. Each is designed for a different flexible training model. All three are archived by default and must be unarchived before they appear as selectable options when scheduling a class.
ℹ These locations already exist — they just need to be unarchived: Client Location, Student Location, and Mobile Location are pre-built records in every CPR Enroll+ account. They are archived by default, which is why they do not appear in the Location dropdown.
Before You Begin
- Decide which of the three flexible models actually fits your business — on-site at a client's facility, instructor travel to students, or a mix of both.
- For Client Location, confirm your corporate clients have complete addresses saved in People > Clients.
- For Mobile Location's "You Come to Us" option, have a list of approved Physical Locations already created.
Step-by-Step Instructions
Step 1: Activate a Default Location
The activation process is the same for all three:
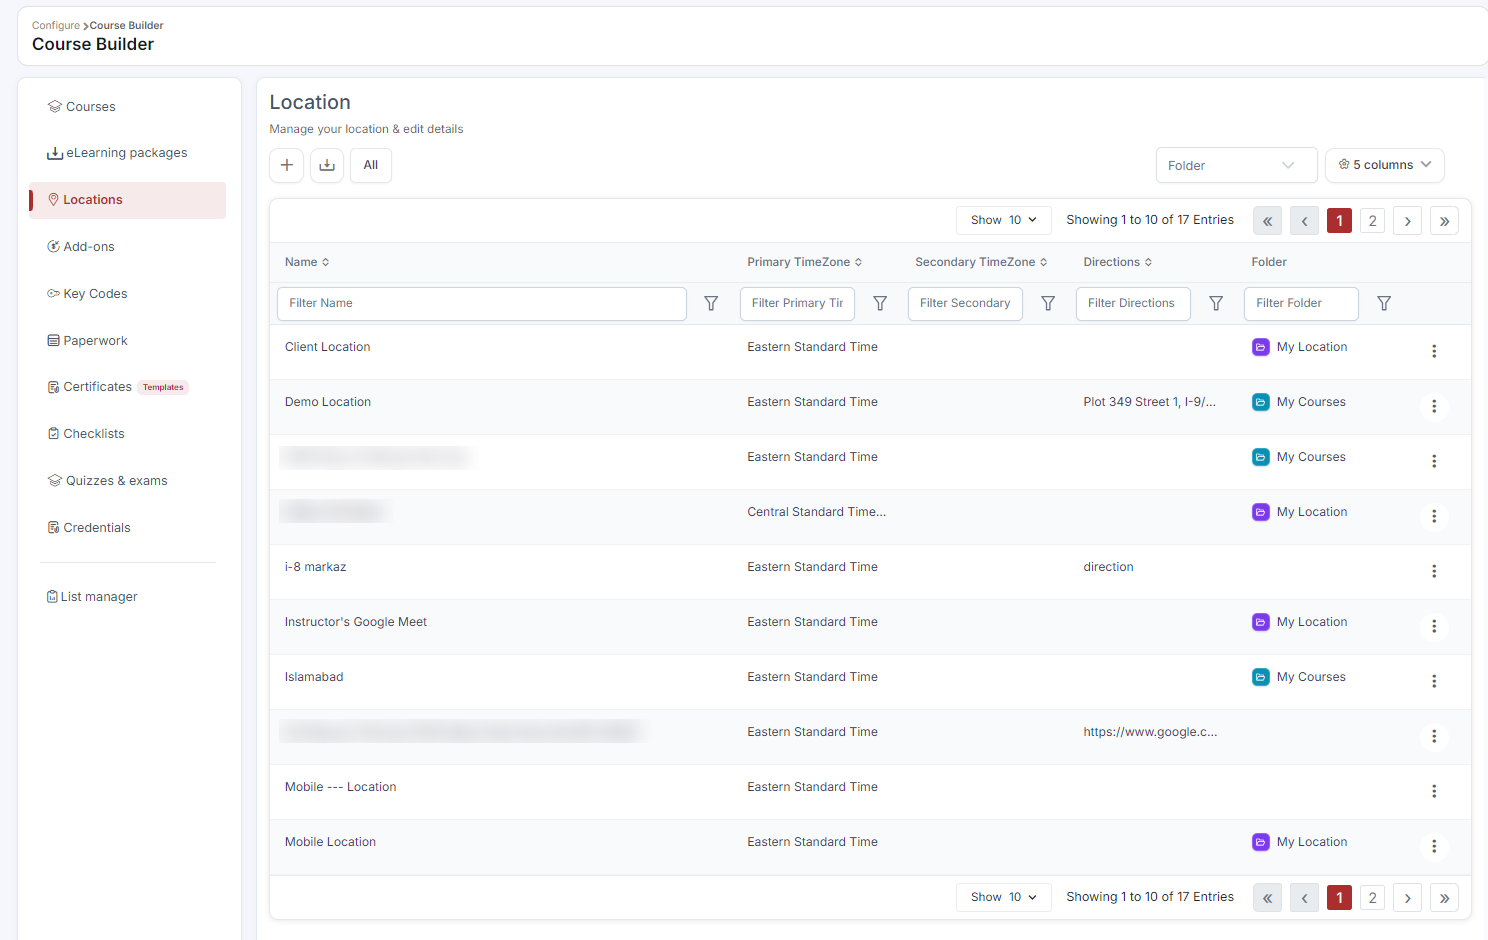
- From the sidebar, go to Course Builder > Locations.
- The list defaults to showing only Active locations. Change the view filter from Active to All — this reveals all locations including archived ones.
- Find the default location you want to activate: Client Location, Student Location, or Mobile Location.
- Click ⋮ > Unarchive on that location's row.
- The location is now active and will appear in the Location dropdown when creating or editing a class (subject to the class type restrictions described below).
Step 2: Set Up Client Location
Client Location is used when you deliver training at a corporate client's facility. The address is not stored on the location record itself — instead, CPR Enroll+ pulls it from the client's saved profile in People > Clients. This means every corporate client with a complete address in CPR Enroll+ automatically provides their address to the class record without any manual entry per class.
- What students see on the registration page: the location displays as "Client Location" so students know training is at their employer's facility.
- What students see in the confirmation email: the client's full address is included along with a Google Map link for directions.
- Availability condition: Client Location only appears in the Location dropdown when a Client is selected in the class creation form. If no client is assigned to the class, this option will not be shown.
To use it:
- Confirm the corporate client has a saved profile in People > Clients with a complete address on file.
- When creating or editing a class, select the corporate client in the Client field first.
- The Location dropdown will now include Client Location as an option — select it.
- Click Save. The client's profile address is now the class location and will appear in all student communications.
✔ Keep client profiles current: The address in the student's confirmation email comes directly from People > Clients. If a client moves offices or has multiple sites, update their profile before scheduling the next class to ensure students receive the correct address.
Step 3: Set Up Student Location
Student Location is used when the instructor travels to each student's address. There is no pre-set venue — instead, CPR Enroll+ collects the student's address during the registration process and that address becomes the training location for their session.
- What students see: during registration, students are prompted to provide the address where they want training delivered. This address is confirmed back to them in their enrollment confirmation email, along with details of who will be coming.
- Availability condition: Student Location is only available for classes using the Flexible class type. It will not appear in the Location dropdown for standard In Person, Virtual, Blended, or other non-flexible class types.
- Use cases: private one-on-one CPR instruction at a client's home, healthcare provider training at individual care facilities, corporate wellness programs visiting different employee locations, or any scenario where the instructor is the traveling party.
Step 4: Set Up Mobile Location
Mobile Location is the most flexible option. It presents the student with a choice at registration between two delivery modes:
- "We Come to You" — acts identically to Student Location. The student enters their address at registration and the instructor travels to them.
- "You Come to Us" — the student selects from a list of pre-approved venues that the instructor has made available for this specific class. The instructor pre-selects any number of saved physical locations as eligible options, and the student picks the one most convenient for them.
Availability condition: Mobile Location is only available for Flexible class types, the same as Student Location.
To set up the "You Come to Us" option:
- Unarchive Mobile Location (see Step 1 above).
- Create a new class and select Flexible as the class type.
- Select Mobile Location from the Location dropdown.
- In the class form, configure the available venues — select the saved physical Location records you are willing for students to choose from. These must already exist as Physical Locations in your account.
- Save the class. Students who choose "You Come to Us" during registration will then select from your pre-approved venue list.
Use cases: mobile CPR training services that offer both home visits and a network of drop-in locations, instructors who split their time between a training center and corporate on-site visits, or community programs where students choose the venue closest to them.
Quick Reference — All Three Default Locations
| Client Location | Student Location | Mobile Location | |
|---|---|---|---|
| Address source | Client's People > Clients profile | Student provides at registration | Student's address OR student picks from approved venues |
| Available class types | Any (when a Client is selected in the class) | Flexible only | Flexible only |
| Registration page shows | "Client Location" | Address input field | "We Come to You" / "You Come to Us" choice |
| Confirmation email includes | Client address + Google Map link | Student's provided address | Address based on student's selection |
| Instructor action required | Keep client profile address current | None after setup | Pre-select approved venues on each class |
⚠ Activate only what your model requires: There is no technical problem with unarchiving all three — CPR Enroll+ shows only the relevant options based on class type and whether a client is selected. However, activating locations you do not use adds unnecessary options to the Location dropdown and can cause confusion when scheduling. Unarchive only the ones your business actually needs.
Best Practices
- Only unarchive the default locations your business model actually uses to keep the Location dropdown simple.
- Keep client profile addresses current, since Client Location pulls the address directly from People > Clients.
- Pre-select a solid set of approved venues for Mobile Location's "You Come to Us" option so students have real choice.
- Remember Student Location and Mobile Location only work with the Flexible class type — plan your course setup accordingly.
Frequently Asked Questions
| Question | Answer |
|---|---|
| Why don't I see Client Location, Student Location, or Mobile Location in my dropdown? | They're archived by default in every account. Change the Locations view filter to All, then unarchive the one you want to use. |
| Can I use Student Location with a standard In Person class? | No. Student Location is only available for the Flexible class type. |
| Where does the address come from for Client Location? | It's pulled automatically from the client's saved profile in People > Clients, not entered manually per class. |
✔ You're all set. You understand how Client, Student, and Mobile Locations work, and you know how to activate and configure the ones your business needs.
Was this article helpful?
That’s Great!
Thank you for your feedback
Sorry! We couldn't be helpful
Thank you for your feedback
Feedback sent
We appreciate your effort and will try to fix the article