When someone buys a product from your Store, CPR Enroll+ creates an order and starts it through a four-stage fulfillment pipeline. The Fulfillment tab is where you watch those orders, move them along, and reconcile what was paid.
Step 1: Open the Orders List
- From the sidebar, go to Store.
- Across the top are three tabs — Build, Buy and Fulfillment. Click Fulfillment.
- Below it, choose the Orders sub-tab. Payments sits next to it.
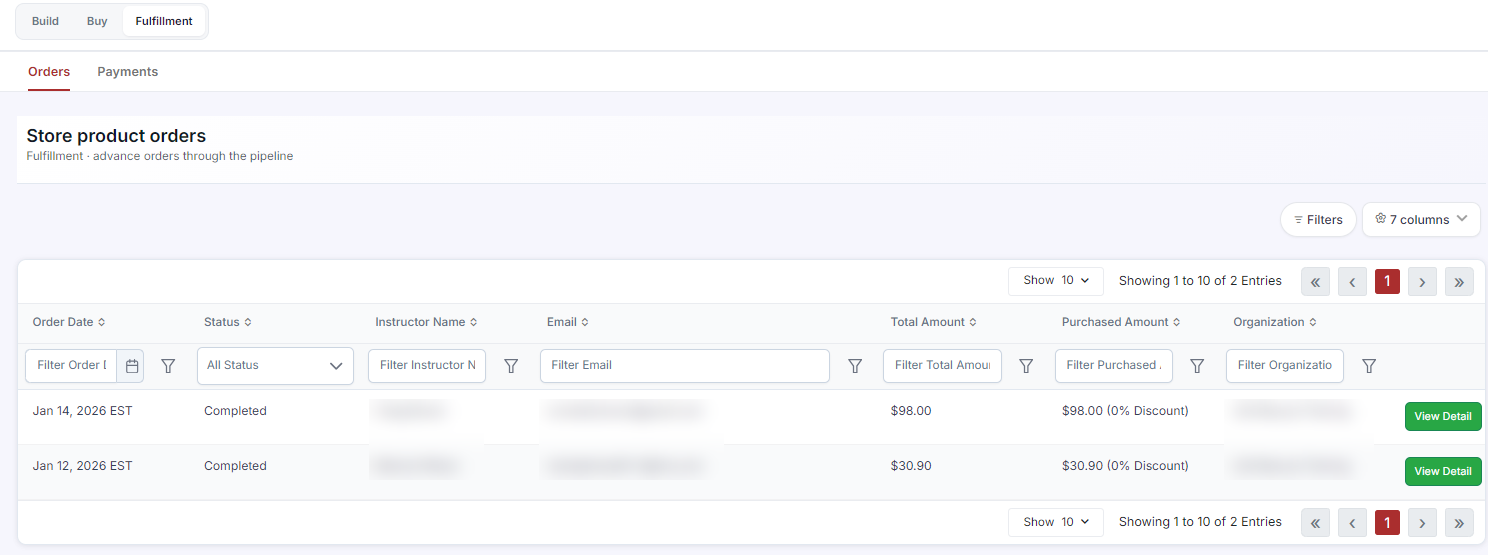
The Store product orders grid lists Order Date, Status, Instructor Name, Email, Total Amount, Purchased Amount (with the discount percentage applied) and Organization. Every column has its own filter, and the Filters and columns controls in the top right let you narrow the view further or show and hide fields. Click View Detail on any row to open the order.
Step 2: Work the Fulfillment Pipeline
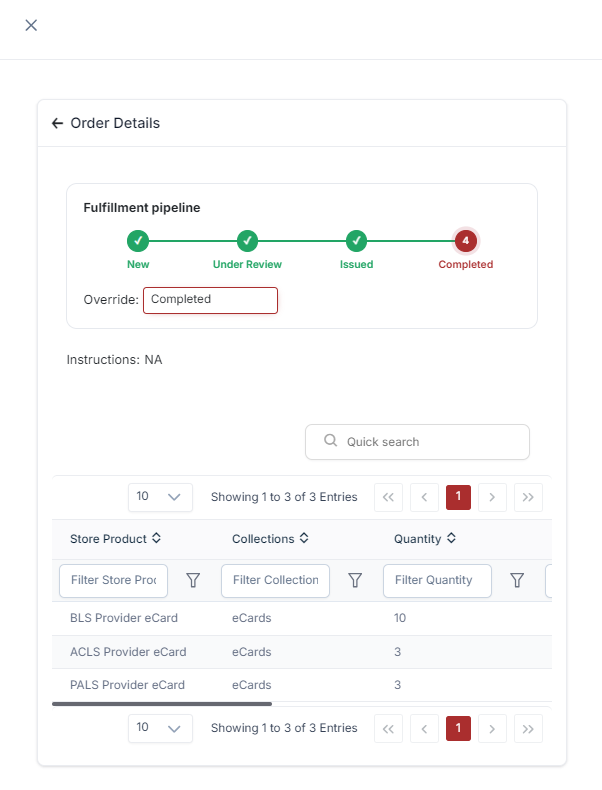
The order detail opens on the Fulfillment pipeline — four stages, shown left to right, with the completed ones ticked:
- New — the order has been placed and paid for, and nobody has touched it yet.
- Under Review — someone on your team has picked it up and is checking it.
- Issued — the goods have gone out: the eCards or keycodes have been assigned, or the physical items have shipped.
- Completed — the order is finished and needs nothing further.
Below the pipeline, the Override dropdown moves an order to any stage directly. It also holds two exit states that are not part of the normal flow: Cancelled and Refunded.
Instructions shows anything the buyer entered at checkout, and the table underneath lists every line item on the order — Store Product, Collection and Quantity — with its own quick search and filters.
Step 3: Track Store Payments
- Go to Store > Fulfillment > Payments.
- This view shows payment-level detail: Payment ID, Made On, Amount, masked Card Number, Payment Status, and a link to the full transaction record.
Step 4: Reconcile Against Transactions
For a single view of all financial activity across the platform — store purchases alongside enrollments, invoices and add-ons — go to Payments > Transactions and use the Type filter to show store transactions only. This is the view to use for accounting reconciliation.
Processing a Store Refund
Locate the transaction in Payments > Transactions and use the in-platform refund action, or process the refund through your Stripe dashboard. Then return to the order and set its status to Refunded so the fulfillment record matches. See Managing Refunds and Disputes for the full process.
Best Practices
- Move orders through the stages as you actually work them. An order parked at New for a week is indistinguishable from one nobody has seen.
- Use Under Review as a genuine claim on the order so two people do not fulfill the same one.
- Reserve the Override for corrections and exits. Advancing orders normally keeps the timeline honest.
- Refund the money first, then set the status. Doing it the other way around leaves an order that looks settled and is not.
- Check the Payments sub-tab against Payments > Transactions at month end — store revenue is easy to miss when it is reconciled separately.
Was this article helpful?
That’s Great!
Thank you for your feedback
Sorry! We couldn't be helpful
Thank you for your feedback
Feedback sent
We appreciate your effort and will try to fix the article