Courses are the foundation of everything you sell on CPR Enroll — they define what students are learning, how they're certified, how much they pay, and how classes are scheduled. Setting up a course correctly the first time ensures a smooth experience for both your team and your students.
This article walks you through every section of the Create Course window, from basic details through pricing, scheduling, and communications.
Before You Begin
Since a course has many configurable sections, it helps to gather the following before you start:
- Course name and discipline (e.g., BLS, ACLS, Heartsaver).
- Pricing details, including who pays the platform fee and whether coupons apply.
- Certification validity period, in years.
- Any keycode banks or reschedule rules you plan to use.
- Course and cover images, sized according to the recommendations below.
- Association and CEU credit information, if applicable to your course.
✔ Tip: You can save a course before completing every section, then return to finish sections like Registration Form and Display & Media later.
Step-by-Step Instructions
Step 1: Open Your Setup Guide
- From the opening screen, click Settings on the left menu.
- Click Setup Guide.
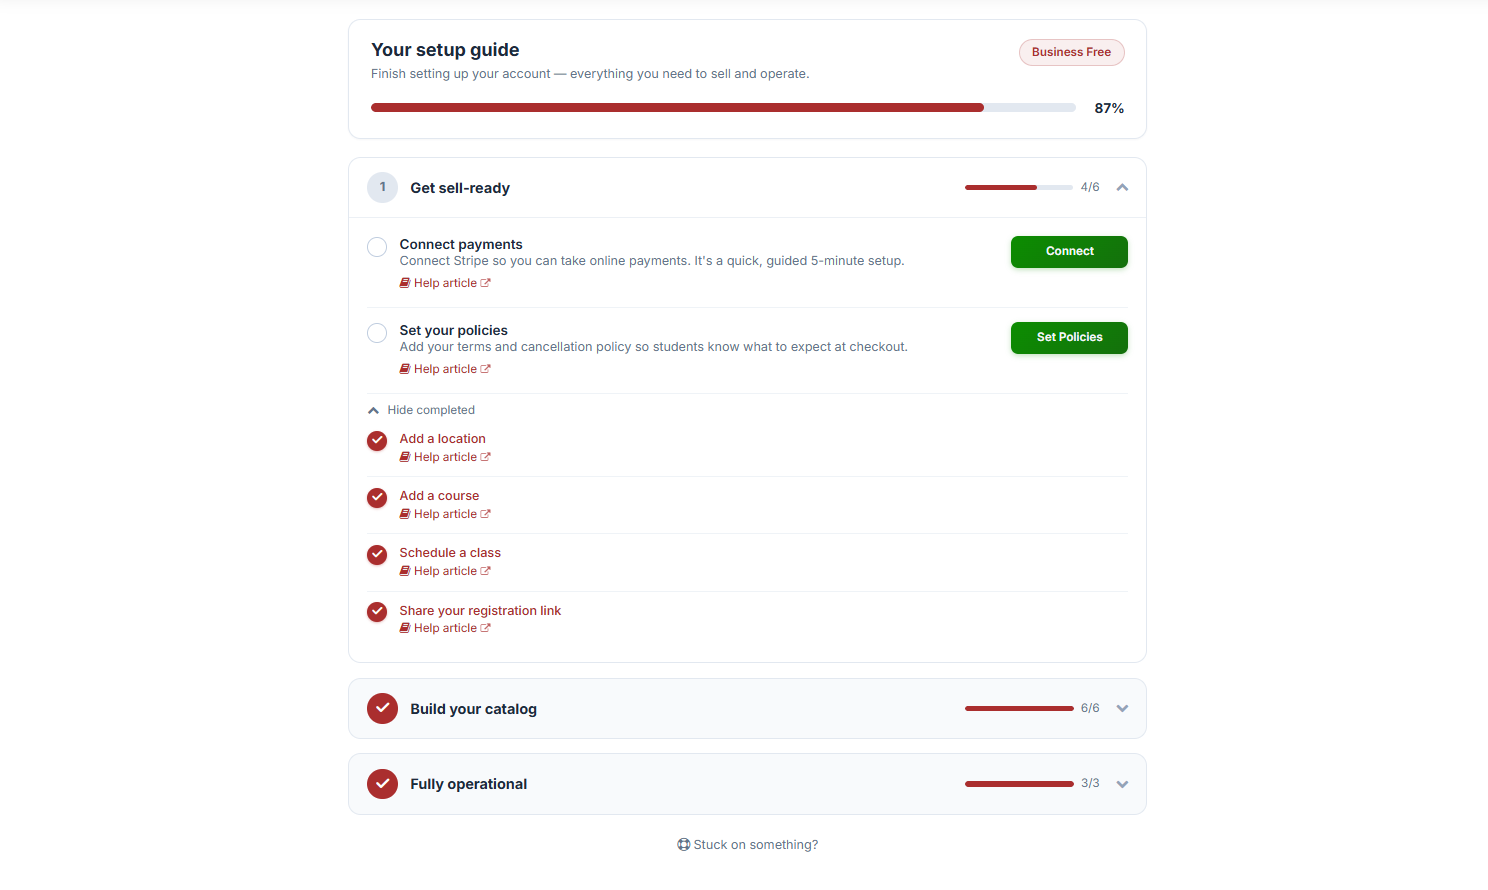
You'll land on Your Setup Guide, where you can finish setting up your account with everything you need to sell and operate.
Step 2: Add a Course
Under 1. Get Sell-Ready, click Add a Course.
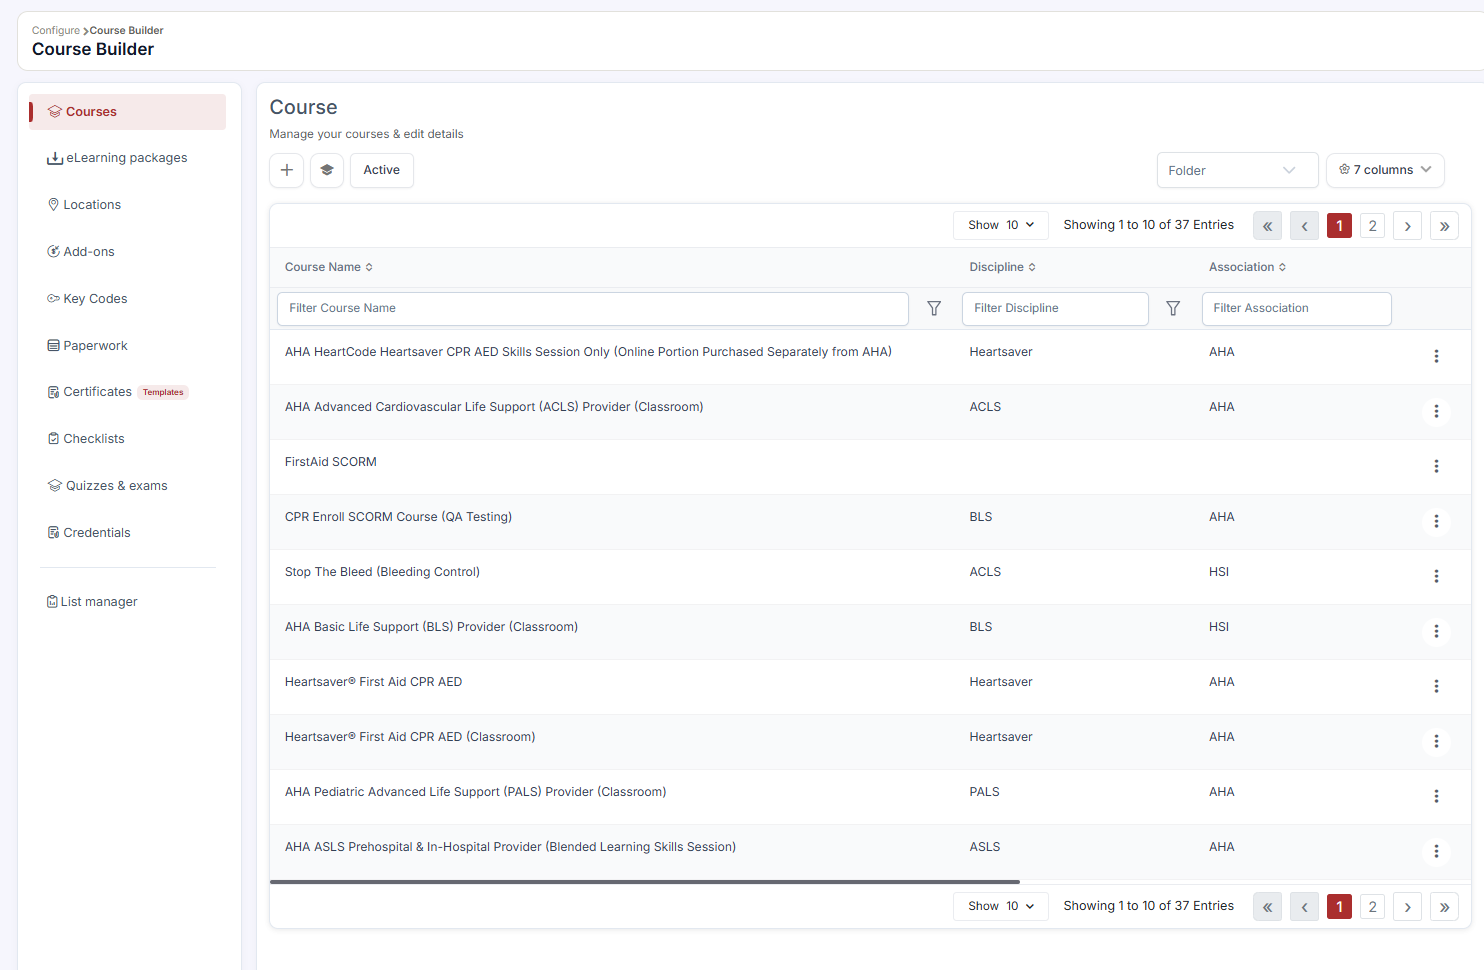
This opens the Course screen, where you can manage your courses and edit their details. Click the + (Add New) button to open the Create Course window, then fill out the sections below.
Step 3: Complete Course Details
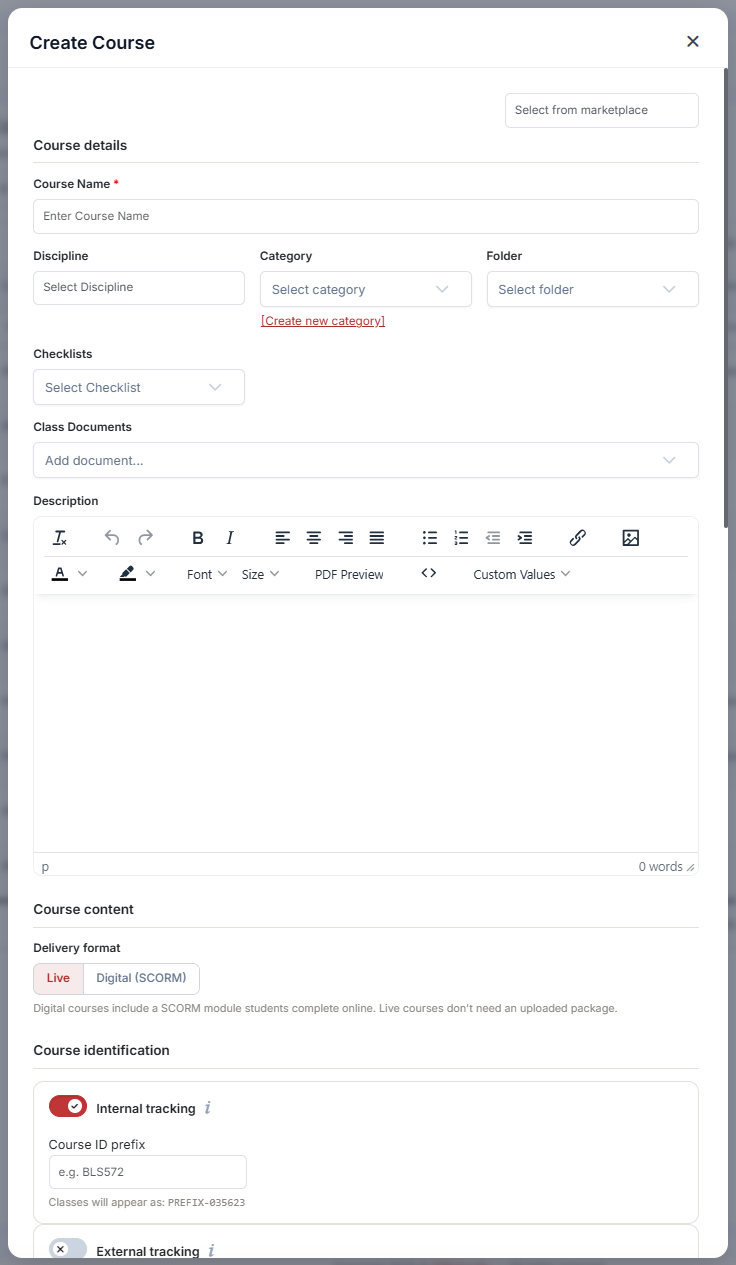
- Course Name (required)
- Discipline — select from: ACLS, ASLS, BBP, BLS, CPR/AED, EMS, First Aid, First Aid CPR/AED, Heartsaver, NRP, PALS, PEARS, or Other.
- Category
- Checklists
- Class Documents
- Description — add a written description, with a PDF preview option available.
Step 4: Set Course Content
- Delivery Format— choose Live or Digital (SCORM).
- Digital courses include a SCORM module that students complete online.
- Live courses don't require an uploaded package.
Step 5: Configure Course Identification
- Internal Tracking
- Course ID Prefix — classes will appear using this prefix (e.g.,
PREFIX-035623).
- Course ID Prefix — classes will appear using this prefix (e.g.,
- External Tracking
Step 6: Set Pricing
- Price — set the course price.
- Platform Fee — choose whether the Account or the Student pays the fee.
- Coupons — select applicable coupons (promo codes).
- Add-ons — add optional add-ons and descriptions.
- Sales Tax — calculated automatically by Stripe based on the customer's address and your tax nexus registrations. Most courses don't require tax — enable only if your jurisdiction taxes educational services.
Step 7: Configure Enrollment & Scheduling
- Minimum Enrollments to Start Class — set a minimum headcount, with an option to notify if enrollment falls below it (measured in days, weeks, or months before the class).
- Close Registration Date — set how many days before the class starts registration should close.
- Certification Expires After (required) — set the certification validity period, in years.
- Reschedule Rule — select from: Match Terms and Conditions, Standard, Standard Reschedule, Standard Rescheduling, or Test Reschedule.
- Use Keycode Bank — select from available templates, such as Demo Keycode Templates (Standard), Keycode Template (Standard), or Standard KeyBank.
Step 8: Set Up Registration
- Registration Form — use the organization default, or select a customized registration form.
Note: Save the course first before choosing a registration form. - Registration Question Bank — automatically added to the default registration form. This is hidden when a custom form is selected, since custom forms carry their own questions.
Step 9: Add Credentials
- CEU Credits
- Association — select from: AAP, AHA, ARC, ECSI, HSI, or SafeSitter.
- Certificate — assign the certificate students will receive upon completion.
Step 10: Set Display & Media
- Course Image — recommended size: 322 × 220.
- Cover Image — recommended size: 1358 × 570.
- Calendar Event Color — set background and font colors for calendar display.
- Featured — mark the course as featured, if desired.
Step 11: Configure Communications
- Confirmation Email — set up the confirmation email students receive upon enrollment.
Step 12: Save Your Course
Once all details are complete, click Create to finalize your course.
Best Practices
- Use a consistent Course ID Prefix naming convention across your catalog, so class IDs stay easy to scan and search (e.g.,
BLS-,ACLS-,HRT-). - Set your Certification Expires After field carefully, since this drives renewal reminders and compliance tracking for your students.
- Save your course before assigning a custom Registration Form, since this step requires the course to already exist.
- Use high-quality, correctly sized images for your Course and Cover Images to keep your catalog looking polished and consistent.
- Only enable Sales Tax if required in your jurisdiction, since applying it unnecessarily can create confusion at checkout.
Frequently Asked Questions
| Question | Answer |
|---|---|
| Can I edit a course after it's created? | Yes. You can return to the Course screen anytime to edit pricing, scheduling, media, or any other course details. |
| What's the difference between Live and Digital (SCORM) delivery? | Live courses are taught in person or virtually with no uploaded package required. Digital (SCORM) courses include an online module that students complete independently. |
| Who decides whether the platform fee is paid by the account or the student? | You do — this is configured under the Pricing section, and can be set per course based on your business preference. |
| Do all courses need Sales Tax enabled? | No. Most courses don't require tax. Only enable this if your jurisdiction taxes educational services, since Stripe will calculate it automatically based on the customer's address and your tax nexus registrations. |
| What happens if I don't set a Reschedule Rule? | It's recommended to select a reschedule rule so students have clear expectations if they need to change their class date. Check with your team on which rule matches your standard policy. |
✔ You're all set. Your course is now live and ready for students to enroll. You can return to this screen anytime to edit course details, pricing, or scheduling rules.
Was this article helpful?
That’s Great!
Thank you for your feedback
Sorry! We couldn't be helpful
Thank you for your feedback
Feedback sent
We appreciate your effort and will try to fix the article