Connection Settings does two jobs: it controls whether other organizations can find you in the public directory, and it sets the permissions each new connection starts with. Both are worth getting right before you start connecting.
Before You Begin
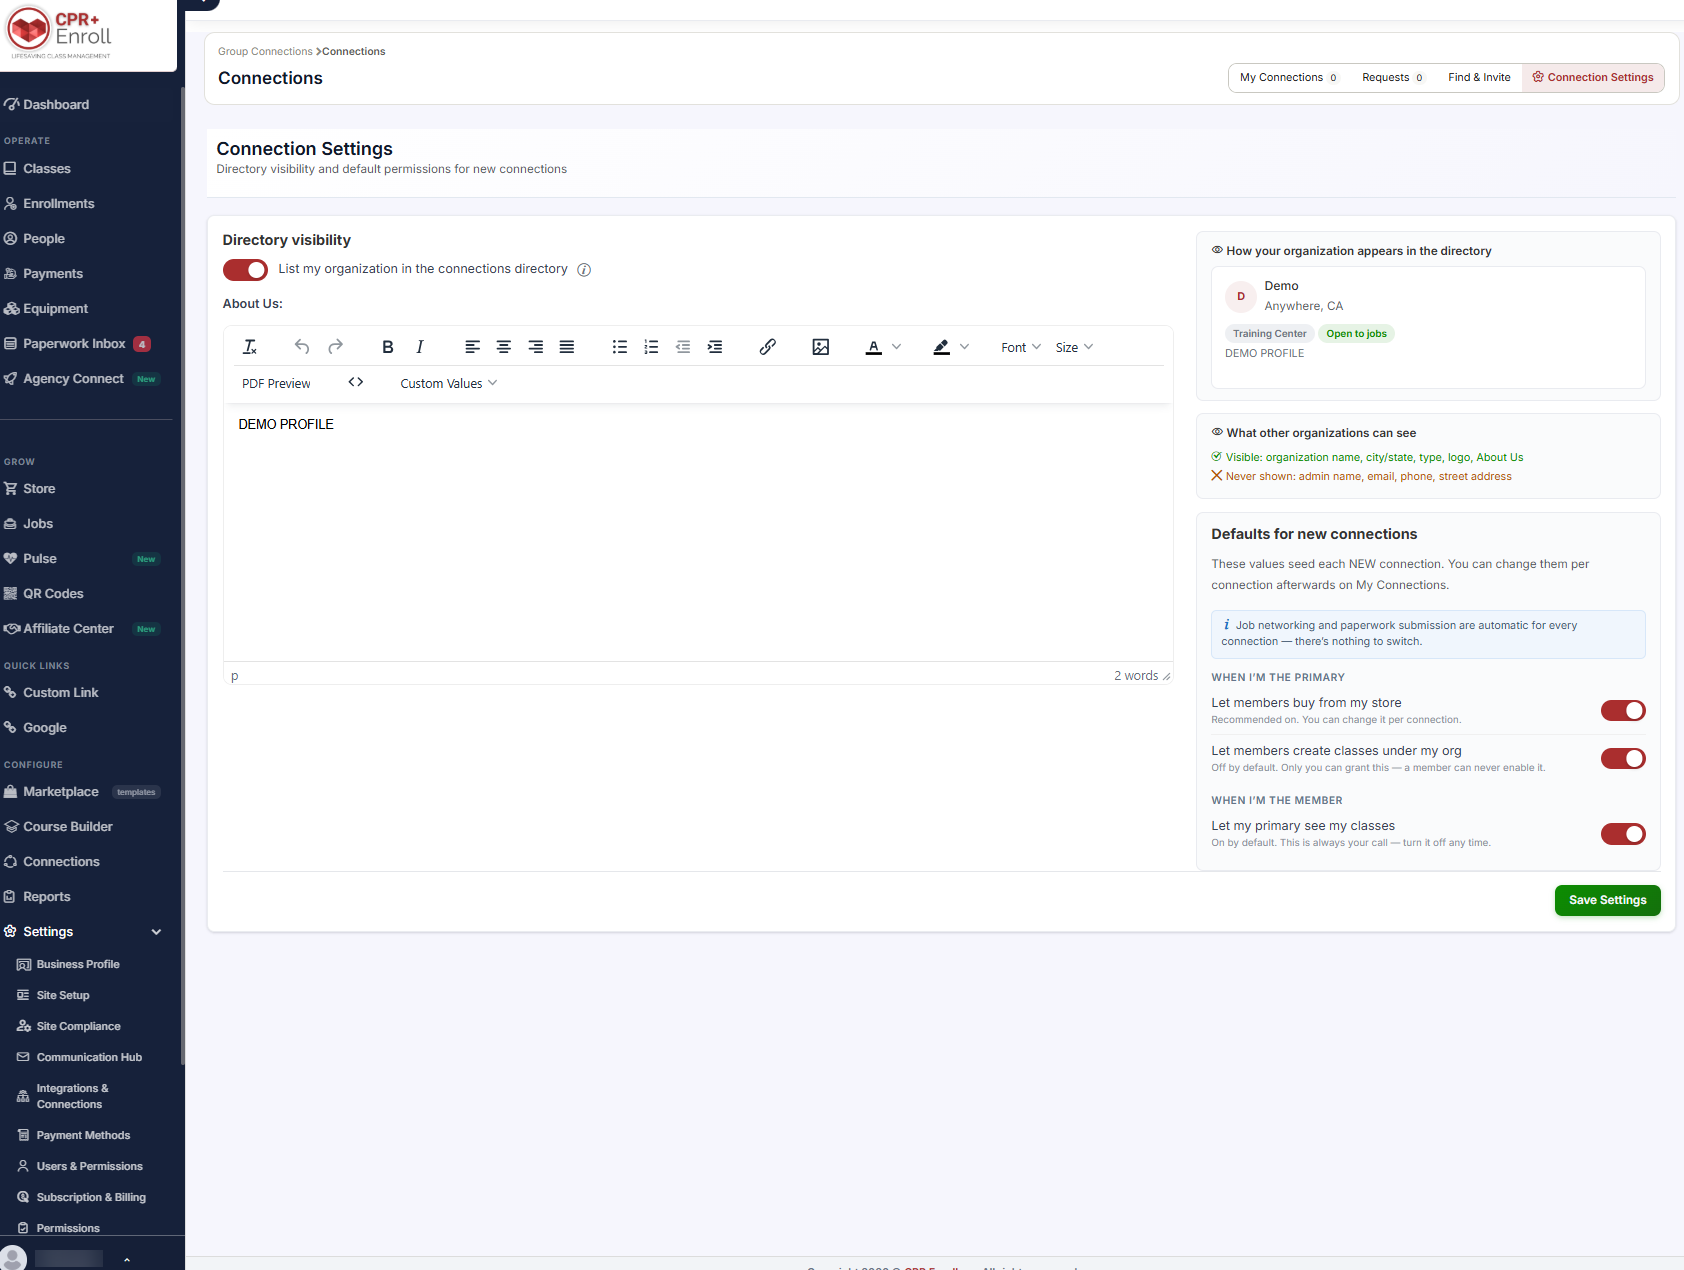
- Find it at Connections → Connection Settings. The page covers directory visibility and default permissions for new connections.
- Have your About Us text ready — it is what other organizations read on your directory card.
- Understand the key limit: defaults apply only to connections created after you change them.
Step 1: Set Directory Visibility
- Toggle List my organization in the connections directory on to appear in the public directory.
- Write your description in the About Us rich-text editor beneath it.
Two panels on the right make the privacy boundary explicit:
- How your organization appears in the directory — a live preview of your card.
- What other organizations can see — the visible-versus-hidden list below.
| Visible | Never shown |
|---|---|
| Organization name | Admin name |
| City / state | |
| Type | Phone |
| Logo | Street address |
| About Us | — |
✔ Your contact details are never in the directory. Admin name, email, phone and street address are never shown — they unlock only once you are connected.
Step 2: Know What Is Automatic
Before you touch the toggles, note this: job networking and paperwork submission are automatic for every connection — there is nothing to switch.
Step 3: Set Defaults for When You Are the Primary
| Setting | Default | Notes |
|---|---|---|
| Let members buy from my store | On | Recommended on. Changeable per connection. |
| Let members create classes under my org | Off | Only you can grant this — a member can never enable it. |
✔ “Create classes under my org” is the significant one. It is off by default and only a primary can grant it. Treat it as a deliberate decision per partner, not a default to flip globally.
Step 4: Set Defaults for When You Are the Member
| Setting | Default | Notes |
|---|---|---|
| Let my primary see my classes | On | Always your call — turn it off any time. |
Click Save Settings when done.
Step 5: Change a Single Connection
Defaults apply only to connections created after you change them. To adjust an existing relationship, open that connection on My Connections and edit its permissions directly.
✔ Changing defaults does not retro-fit. If you have twenty existing connections and you tighten a default today, those twenty are unchanged. Edit them individually.
Best Practices
- Write About Us for a prospective partner, not for a student. The audience is other organizations deciding whether to work with you.
- Leave Let members buy from my store on. It is the least risky permission and the most commonly wanted.
- Grant create classes under my org per connection, never as a default.
- Re-read the visible / never-shown list before worrying about privacy. Most concerns are already covered.
- After changing defaults, audit existing connections on My Connections — they did not change with you.
Frequently Asked Questions
| Question | Answer |
|---|---|
| What appears on my directory card? | Organization name, city/state, type, logo and About Us. |
| Is my email or phone ever in the directory? | No. Admin name, email, phone and street address are never shown. |
| Do I have to enable job networking and paperwork submission? | No. Both are automatic for every connection. |
| Can a member give themselves permission to create classes under my org? | No. Only the primary can grant it, and it is off by default. |
| Can I stop my primary seeing my classes? | Yes. Let my primary see my classes is always your call and can be turned off any time. |
| Will changing a default update my existing connections? | No. Defaults apply only to connections created after the change. |
| How do I change one existing connection? | Open it on My Connections and edit its permissions directly. |
✔ You’re all set. Directory presence controlled, defaults set, and every existing connection still editable one by one.
Was this article helpful?
That’s Great!
Thank you for your feedback
Sorry! We couldn't be helpful
Thank you for your feedback
Feedback sent
We appreciate your effort and will try to fix the article